Apache Spark 4.x Quick Notes :: Part - 1
| Bhaskar S |
*UPDATED*11/27/2025 |
Apache Spark is a general purpose, high-performance, open-source, unified analytics cluster
computing engine for large scale distributed processing of data across a cluster of commodity computers (also referred to
as nodes).
The Spark stack provides support for Batch processing, Interactive querying using SQL, Streaming, Machine Learning, and
Graph Processing.
Spark can run on a variety of cluster managers, such as, the built-in Standalone cluster manager,
Hadoop YARN, Apache Mesos, Kubernetes, or in
any of the cloud environments such as AWS, Azure, or Google Cloud.
Spark can access data from a variety of sources such as local filesystem, Hadoop HDFS, Apache Hive, Apache Cassandra, etc.
Spark can be accessible through either APIs (Java, Scala, Python, R) or through the provided shells (Scala and Python).
The following diagram illustrates the components of the Spark stack:
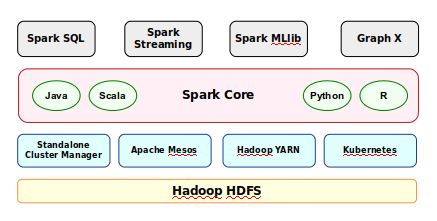
Spark Components
Spark stack consists of the following components:
-
Data layer for persistence (ex: Hadoop HDFS)
-
Cluster Manager to manage the nodes in the cluster (Standalone Cluster Manager, Apache Mesos, Hadoop YARN, or Kubernetes)
-
Core Spark cluster computing engine that is responsible for work scheduling, memory management, fault management, and
storage management
-
Spark SQL provides an SQL interface to access data distributed across the nodes in the cluster
-
Spark Streaming that enables processing of a stream of live data in real-time
-
Spark GraphX is a library for managing graph of data objects
-
Spark MLlib is a library for the common machine learning algorithms
The installation and setup will can on a Ubuntu 24.04 LTS based Linux desktop. Ensure that Docker is installed and setup on the desktop (see instructions).
Assuming the logged in user is alice (with home directory /home/alice), we will setup two required
directories by executing the following command in a terminal window:
$ mkdir -p $HOME/spark{/conf,/data,/logs,/work-dir}
Next, to pull and download the required docker image for Spark, execute the following command in a terminal window:
$ docker pull spark:4.0.1-scala2.13-java21-python3-ubuntu
The following should be the typical output:
Output.1
4.0.1-scala2.13-java21-python3-ubuntu: Pulling from library/spark
7e49dc6156b0: Pull complete
01facf544478: Pull complete
0974368270e4: Pull complete
462f51c3d063: Pull complete
02d80376fd82: Pull complete
892f13c311d1: Pull complete
e89435976ade: Pull complete
c063390a3e34: Pull complete
9dbd2dd572a1: Pull complete
4f4fb700ef54: Pull complete
5744c2ff3ef2: Pull complete
Digest: sha256:84738ac8824a2da1d74c225f4371b4e6109295d39ed75eee085d07286505bd55
Status: Downloaded newer image for spark:4.0.1-scala2.13-java21-python3-ubuntu
docker.io/library/spark:4.0.1-scala2.13-java21-python3-ubuntu
In the directory $HOME/spark/conf, create a configuration file called spark-defaults.conf
with the following contents:
spark-defaults.conf
# This is useful for setting default environmental settings.

spark.log.level     INFO
Next, in the directory $HOME/spark/conf, create a shell file called spark-env.sh with the
following contents:
spark-env.sh
#!/usr/bin/env bash

# This file is sourced when running various Spark programs.

export SPARK_IDENT_STRING=MySparkLocal
export SPARK_NO_DAEMONIZE=1
export SPARK_DRIVER_MEMORY=2g
export SPARK_EXECUTOR_CORES=1
export SPARK_EXECUTOR_MEMORY=1g
export SPARK_WORKER_CORES=2
export SPARK_WORKER_MEMORY=2g
For the hands-on demonstration, we will use the Palmer Penguins dataset (provided as a CSV file), which can be downloaded
from HERE !!!
Download and copy the penguins CSV file to the directory $HOME/spark/data.
This completes the necessary setup for us to get started with Apache Spark !!!
Hands-on Spark using Python
We will use the Python spark shell called pyspark for the hands-on demonstration in the local mode, meaning Spark will run as thread(s) in the same VM as the pyspark shell.
Open a terminal window and execute the following command to launch the pyspark shell:
docker run --rm --name pyspark-local -u $(id -u $USER):$(id -g $USER) -p 4040:4040 -v $HOME/spark/conf:/opt/spark/conf -v $HOME/spark/data:/opt/spark/data -it spark:4.0.1-scala2.13-java21-python3-ubuntu /opt/spark/bin/pyspark --master local[1]
Note that the option local[1] indicates that we want to execute Spark core and the pyspark
shell in the same VM without involving any cluster manager. This mode is quite useful during development and testing. The
number [K] in local[K] indicates the number of system cores to
use and spawn that many worker threads. If we use [*], it indicates use all available system
cores.
The following would be the typical trimmed output:
Output.2
Python 3.10.12 (main, Aug 15 2025, 14:32:43) [GCC 11.4.0] on linux
Type "help", "copyright", "credits" or "license" for more information.
WARNING: Using incubator modules: jdk.incubator.vector
Using Spark's default log4j profile: org/apache/spark/log4j2-defaults.properties
Setting default log level to "WARN".
...[ TRIM ]...
/opt/spark/python/pyspark/shell.py:94: UserWarning: Failed to initialize Spark session.
  warnings.warn("Failed to initialize Spark session.")
...[ TRIM ]...
py4j.protocol.Py4JJavaError: An error occurred while calling None.org.apache.spark.api.java.JavaSparkContext.
: org.apache.hadoop.security.KerberosAuthException: failure to login: javax.security.auth.login.LoginException: java.lang.NullPointerException: invalid null input: name
...[ TRIM ]...
Hmm !!! Something went wrong here ???
The spark user-id in the docker image is set to spark, while we passed in the host user-id of
alice (using the -u docker option). Since the user-id is not found in the docker image, we
encounter this error !!!
We will have to create our own version of the docker image (using the official spark docker image as the base) and adding
the host user-id of alice to the docker image.
In the directory $HOME/spark, create the dockerfile with the following contents:
dockerfile
FROM spark:4.0.1-scala2.13-java21-python3-ubuntu

USER root

ARG user=alice
ARG group=alice
ARG uid=1000
ARG gid=1000

RUN groupadd -g ${gid} ${group}
RUN useradd -u ${uid} -g ${gid} -M -s /sbin/nologin ${user}

RUN usermod -a -G spark ${user}
RUN usermod -a -G ${user} spark

USER ${user}
To build our custom docker image tagged ps-spark:v4.0.1, execute the following command in the
terminal window:
docker build -t 'ps-spark:v4.0.1' .
The following would be the typical trimmed output:
Output.3
[+] Building 0.0s (9/9) FINISHED                                                                 docker:default
 => [internal] load build definition from dockerfile                                                       0.0s
 => => transferring dockerfile: 336B                                                                       0.0s
 => [internal] load metadata for docker.io/library/spark:4.0.1-scala2.13-java21-python3-ubuntu             0.0s
 => [internal] load .dockerignore                                                                          0.0s
 => => transferring context: 2B                                                                            0.0s
 => [1/5] FROM docker.io/library/spark:4.0.1-scala2.13-java21-python3-ubuntu                               0.0s
 => CACHED [2/5] RUN groupadd -g 1000 alice                                                                0.0s
 => CACHED [3/5] RUN useradd -u 1000 -g 1000 -M -s /sbin/nologin alice                                     0.0s
 => CACHED [4/5] RUN usermod -a -G spark alice                                                             0.0s
 => CACHED [5/5] RUN usermod -a -G alice spark                                                             0.0s
 => exporting to image                                                                                     0.0s
 => => exporting layers                                                                                    0.0s
 => => writing image sha256:5260f4fb2f96541b3261567cf202052b536512740cf86f92c86aa0fc78c7ee36               0.0s
 => => naming to docker.io/library/ps-spark:v4.0.1                                                         0.0s
Let us try to re-launch the pyspark shell by executing the following docker command in the terminal window:
docker run --rm --name pyspark-local -u $(id -u $USER):$(id -g $USER) -p 4040:4040 -v $HOME/spark/conf:/opt/spark/conf -v $HOME/spark/data:/opt/spark/data -it ps-spark:v4.0.1 /opt/spark/bin/pyspark --master local[1]
The following would be the typical trimmed output:
Output.4
Python 3.10.12 (main, Aug 15 2025, 14:32:43) [GCC 11.4.0] on linux
Type "help", "copyright", "credits" or "license" for more information.
WARNING: Using incubator modules: jdk.incubator.vector
Using Spark's default log4j profile: org/apache/spark/log4j2-defaults.properties
Setting default log level to "WARN".
To adjust logging level use sc.setLogLevel(newLevel). For SparkR, use setLogLevel(newLevel).
25/11/26 16:41:09 WARN NativeCodeLoader: Unable to load native-hadoop library for your platform... using builtin-java classes where applicable
Setting Spark log level to "INFO".
Welcome to
      ____              __
     / __/__  ___ _____/ /__
    _\ \/ _ \/ _ `/ __/  '_/
   /__ / .__/\_,_/_/ /_/\_\   version 4.0.1
      /_/

Using Python version 3.10.12 (main, Aug 15 2025 14:32:43)
Spark context Web UI available at http://localhost:4040
Spark context available as 'sc' (master = local[1], app id = local-1764175270252).
SparkSession available as 'spark'.
>>>
BINGO - we were able to launch pyspark shell successfully this time !!!
To create a pyspark dataframe from the penguins CSV file, execute the following code snippet:
>>> df = spark.read.csv('/opt/spark/data/penguins.csv', header=True, sep=',', inferSchema=True)
Executing the above Python code generates no output.
To display the schema of the just created pyspark dataframe, execute the following code snippet:
Executing the above Python code generates the following typical output:
Output.5
root
 |-- species: string (nullable = true)
 |-- island: string (nullable = true)
 |-- bill_length_mm: double (nullable = true)
 |-- bill_depth_mm: double (nullable = true)
 |-- flipper_length_mm: integer (nullable = true)
 |-- body_mass_g: integer (nullable = true)
 |-- sex: string (nullable = true)
 |-- year: integer (nullable = true)
To display the top 10 rows of the penguins pyspark dataframe, execute the following code snippet:
Executing the above Python code generates the following typical output:
Output.6
+-------+---------+--------------+-------------+-----------------+-----------+------+----+
|species|   island|bill_length_mm|bill_depth_mm|flipper_length_mm|body_mass_g|   sex|year|
+-------+---------+--------------+-------------+-----------------+-----------+------+----+
| Adelie|Torgersen|          39.1|         18.7|              181|       3750|  male|2007|
| Adelie|Torgersen|          39.5|         17.4|              186|       3800|female|2007|
| Adelie|Torgersen|          40.3|         18.0|              195|       3250|female|2007|
| Adelie|Torgersen|          36.7|         19.3|              193|       3450|female|2007|
| Adelie|Torgersen|          39.3|         20.6|              190|       3650|  male|2007|
| Adelie|Torgersen|          38.9|         17.8|              181|       3625|female|2007|
| Adelie|Torgersen|          39.2|         19.6|              195|       4675|  male|2007|
| Adelie|Torgersen|          34.1|         18.1|              193|       3475|  male|2007|
| Adelie|Torgersen|          42.0|         20.2|              190|       4250|  male|2007|
| Adelie|Torgersen|          37.8|         17.1|              186|       3300|female|2007|
+-------+---------+--------------+-------------+-----------------+-----------+------+----+
only showing top 10 rows
To display the top 10 rows with specific columns from the penguins pyspark dataframe, execute the following code snippet:
>>> df.select('species', 'body_mass_g', 'sex').show(10)
Executing the above Python code generates the following typical output:
Output.7
+-------+-----------+------+
|species|body_mass_g|   sex|
+-------+-----------+------+
| Adelie|       3750|  male|
| Adelie|       3800|female|
| Adelie|       3250|female|
| Adelie|       3450|female|
| Adelie|       3650|  male|
| Adelie|       3625|female|
| Adelie|       4675|  male|
| Adelie|       3475|  male|
| Adelie|       4250|  male|
| Adelie|       3300|female|
+-------+-----------+------+
only showing top 10 rows
To display the top 10 rows after sorting the penguins pyspark dataframe in a descending order on the column species, execute the following code snippet:
>>> from pyspark.sql import functions as F
>>> df.sort(F.desc('species')).show(10)
Executing the above Python code generates the following typical output:
Output.8
+-------+------+--------------+-------------+-----------------+-----------+------+----+
|species|island|bill_length_mm|bill_depth_mm|flipper_length_mm|body_mass_g|   sex|year|
+-------+------+--------------+-------------+-----------------+-----------+------+----+
| Gentoo|Biscoe|          46.1|         13.2|              211|       4500|female|2007|
| Gentoo|Biscoe|          40.9|         13.7|              214|       4650|female|2007|
| Gentoo|Biscoe|          50.0|         16.3|              230|       5700|  male|2007|
| Gentoo|Biscoe|          48.7|         14.1|              210|       4450|female|2007|
| Gentoo|Biscoe|          50.0|         15.2|              218|       5700|  male|2007|
| Gentoo|Biscoe|          47.6|         14.5|              215|       5400|  male|2007|
| Gentoo|Biscoe|          46.5|         13.5|              210|       4550|female|2007|
| Gentoo|Biscoe|          45.4|         14.6|              211|       4800|female|2007|
| Gentoo|Biscoe|          46.7|         15.3|              219|       5200|  male|2007|
| Gentoo|Biscoe|          43.3|         13.4|              209|       4400|female|2007|
+-------+------+--------------+-------------+-----------------+-----------+------+----+
only showing top 10 rows
We will now demonstrate how one can use SQL queries on the penguins pyspark dataframe.
To create an SQL view from the penguins pyspark dataframe, execute the following code snippet:
>>> df.createOrReplaceTempView('penguins')
Executing the above Python code generates no output.
To create a pyspark dataframe from the penguins SQL view, execute the following code snippet:
>>> sql_df = spark.sql('SELECT * from penguins WHERE body_mass_g > 5000')
Executing the above Python code generates no output.
To display the number of rows in the just created sql pyspark dataframe, execute the following code snippet:
Executing the above Python code generates the following typical output:
To display rows from the sql pyspark dataframe after filtering rows for which the column bill_length_mm
is greater than 52, execute the following code snippet:
>>> sql_df.filter(sql_df['bill_length_mm'] > 52).show()
Executing the above Python code generates the following typical output:
Output.10
+-------+------+--------------+-------------+-----------------+-----------+----+----+
|species|island|bill_length_mm|bill_depth_mm|flipper_length_mm|body_mass_g| sex|year|
+-------+------+--------------+-------------+-----------------+-----------+----+----+
| Gentoo|Biscoe|          59.6|         17.0|              230|       6050|male|2007|
| Gentoo|Biscoe|          54.3|         15.7|              231|       5650|male|2008|
| Gentoo|Biscoe|          52.5|         15.6|              221|       5450|male|2009|
| Gentoo|Biscoe|          52.1|         17.0|              230|       5550|male|2009|
| Gentoo|Biscoe|          52.2|         17.1|              228|       5400|male|2009|
| Gentoo|Biscoe|          55.9|         17.0|              228|       5600|male|2009|
| Gentoo|Biscoe|          53.4|         15.8|              219|       5500|male|2009|
| Gentoo|Biscoe|          55.1|         16.0|              230|       5850|male|2009|
+-------+------+--------------+-------------+-----------------+-----------+----+----+
Now, before we exit the pyspark shell, let us briefly look at the Spark web UI.
To access the Spark web UI in a web browser, visit the URL http://192.168.1.25:4040.
The following screenshot depicts the Spark web UI accessed from a web browser:

Spark Web UI
To exit the pyspark shell, execute the following code snippet:
Executing the above Python code generates no output.
With this, we conclude the setup and demonstration of Apache Spark on a Linux desktop in the local mode !!!