Figure.1
| PolarSPARC |
Quick Primer on Ollama
| Bhaskar S | *UPDATED*04/04/2026 |
Overview
Ollama is a powerful open source platform that simplifies the process of running various Large Language Models (or LLM s for short) on cloud (Ollama's cloud service) as well as on a local machine. It enables one to download the various pre-trained LLM models such as, Alibaba Qwen 3.5, Google Gemma-4, IBM Granite 4, Microsoft Phi-4, OpenAI GPT-OSS, etc., and use them for building AI applications.
In this article, we will *ONLY* demonstrate the setup and usage on a local machine.
The Ollama platform also exposes an API endpoint, which enables developers to build agentic AI applications that can interact with the LLM(s) using the API endpoint.
Last but not the least, the Ollama platform effectively leverages the underlying hardware resouces of the machine, such as CPU(s) and GPU(s), to efficiently and optimally run the LLMs for better performance.
In this primer, we will demonstrate how one can effectively setup and run the Ollama platform using the Docker image on a local machine.
Installation and Setup
The installation and setup will can on a Ubuntu 24.04 LTS based Linux desktop OR a Apple Silicon based Macbook Pro. Ensure that Docker is installed and setup on the desktop (see instructions).
For Linux and MacOS, ensure that the Python 3.1x programming language as well as the Jupyter Notebook packages are installed. In addition, ensure the command-line utilities curl and jq are installed.
For Linux and MacOS, we will setup two required directories by executing the following command in a terminal window:
$ mkdir -p $HOME/.ollama
For Linux and MacOS, to pull and download the required docker image for Ollama, execute the following command in a terminal window:
$ docker pull ollama/ollama:0.20.2
The following should be the typical output:
0.20.2: Pulling from ollama/ollama
817807f3c64e: Pull complete
ae25ca5ada6c: Pull complete
b3bf5de5eebd: Pull complete
d31d0971c10d: Pull complete
Digest: sha256:0455f166da85b1d07f694c33ba09278ca649603c0611ba8e46272b16eed7fccd
Status: Downloaded newer image for ollama/ollama:0.20.2
docker.io/ollama/ollama:0.20.2
For Linux and MacOS, to install the necessary Python packages, execute the following command:
$ pip install dotenv ollama pydantic
Note that by default, docker on MacOS is ONLY configured to use upto 8GB of RAM !!!
The following are the steps to adjust the docker resource usage configuration on MacOS:
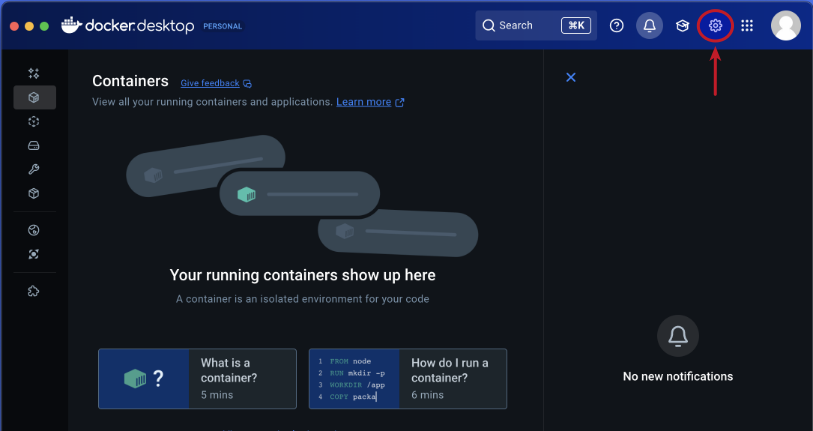
Open the Docker Desktop on MacOS and click on the Settings gear icon as shown in the following illustration:
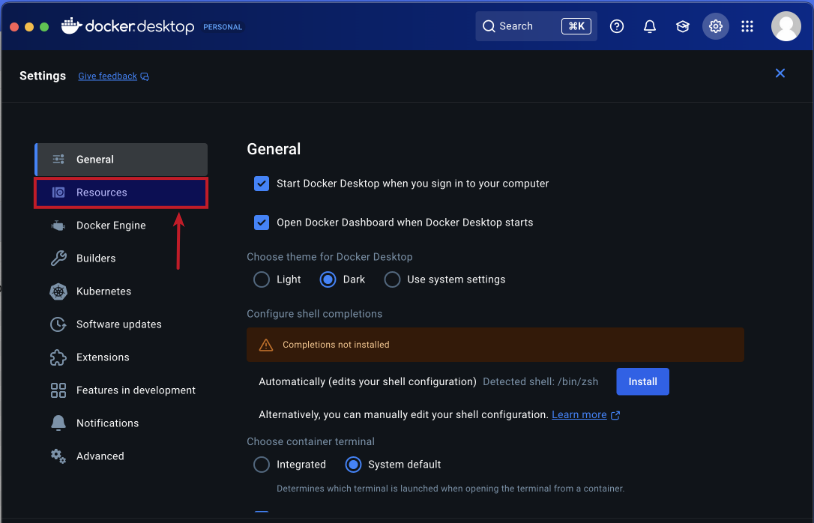
Click on the Resources item from the options on the left-hand side as shown in the following illustration:
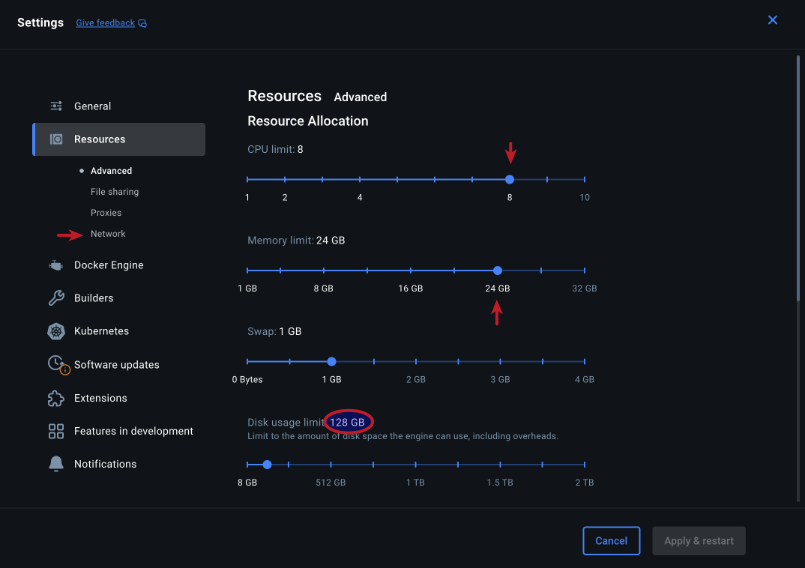
Choose the CPU, Memory, and Disk Usage limits and then click on the Network item under Resources on the left-hand side as shown in the following illustration:
Choose the Enable Host Networking option and then click on the Apply & Restart button as shown in the following illustration:

Finally, reboot the MacOS system for the changes to take effect.
This completes all the system installation and setup for the Ollama hands-on demonstration.
Hands-on with Ollama
In the following sections, we will show the commands for both Linux and MacOS, however, we will ONLY show the output from Linux. Note that all the commands have been tested on both Linux and MacOS respectively.
Assuming that the ip address on the Linux desktop is 192.168.1.25, start the Ollama platform by executing the following command in the terminal window:
$ docker run --rm --name ollama -p 192.168.1.25:11434:11434 -v $HOME/.ollama:/root/.ollama ollama/ollama:0.20.2
For MacOS, start the Ollama platform by executing the following command in the terminal window:
$ docker run --rm --name ollama -p 11434:11434 -v $HOME/.ollama:/root/.ollama ollama/ollama:0.20.2
If the linux desktop has Nvidia GPU with decent amount of VRAM (at least 16 GB) and has been enabled for use with docker (see instructions), then execute the following command instead to start Ollama:
$ docker run --rm --name ollama --gpus=all -p 192.168.1.25:11434:11434 -v $HOME/.ollama:/root/.ollama ollama/ollama:0.20.2
On the MacOS, currently there is NO SUPPORT for the Apple Silicon GPU and the above command WILL NOT work !!!
Note that one can optimize the Ollama server instance by passing options via environment variables. The following table summarizes some of the commonly used configuration options:
| Option | Description |
|---|---|
| OLLAMA_CONTEXT_LENGTH | Specifies the maximum number of tokens that the model has access to in memory. Default is 2048 |
| OLLAMA_FLASH_ATTENTION | Enables Flash Attention to significantly reduce memory usage as the context size grows. To enable, set the value to 1 |
| OLLAMA_KV_CACHE_TYPE | Specifies the the type of quantization to use with the KV Cache. Default is f16. Setting to q8_0 implies 8-bit quantization with a very small loss in precision. Setting to q4_0 implies 4-bit quantization with a small to medium loss in precision |
| OLLAMA_NUM_PARALLEL | The maximum number of parallel requests each model can process at the same time. Default is 1 |
| OLLAMA_MAX_LOADED_MODELS | The maximum number of models that can be loaded concurrently provided they fit in available memory. Default is 1 for CPU and 3 for GPU |
| OLLAMA_KEEP_ALIVE | The maximum time models stay loaded in memory after last use (e.g., 5m, 1h, -1 for forever, 0 to unload immediately). Default is 5m |
| OLLAMA_MAX_QUEUE | The maximum number of requests Ollama will queue when busy before rejecting additional requests. Default is 512 |
For this hands-on demonstration, we start the Ollama server by executing the following command in the terminal window:
$ docker run --rm --name ollama --gpus=all -e OLLAMA_FLASH_ATTENTION=1 -e OLLAMA_KV_CACHE_TYPE=q8_0 -e OLLAMA_CONTEXT_LENGTH=8192 -p 192.168.1.25:11434:11434 -v $HOME/.ollama:/root/.ollama ollama/ollama:0.20.2
The following should be the typical output on Linux:
time=2026-04-04T23:18:25.182Z level=INFO source=routes.go:1744 msg="server config" env="map[CUDA_VISIBLE_DEVICES: GGML_VK_VISIBLE_DEVICES: GPU_DEVICE_ORDINAL: HIP_VISIBLE_DEVICES: HSA_OVERRIDE_GFX_VERSION: HTTPS_PROXY: HTTP_PROXY: NO_PROXY: OLLAMA_CONTEXT_LENGTH:8192 OLLAMA_DEBUG:INFO OLLAMA_DEBUG_LOG_REQUESTS:false OLLAMA_EDITOR: OLLAMA_FLASH_ATTENTION:true OLLAMA_GPU_OVERHEAD:0 OLLAMA_HOST:http://0.0.0.0:11434 OLLAMA_KEEP_ALIVE:10m0s OLLAMA_KV_CACHE_TYPE:q8_0 OLLAMA_LLM_LIBRARY: OLLAMA_LOAD_TIMEOUT:5m0s OLLAMA_MAX_LOADED_MODELS:0 OLLAMA_MAX_QUEUE:512 OLLAMA_MODELS:/root/.ollama/models OLLAMA_MULTIUSER_CACHE:false OLLAMA_NEW_ENGINE:false OLLAMA_NOHISTORY:false OLLAMA_NOPRUNE:false OLLAMA_NO_CLOUD:false OLLAMA_NUM_PARALLEL:1 OLLAMA_ORIGINS:[http://localhost https://localhost http://localhost:* https://localhost:* http://127.0.0.1 https://127.0.0.1 http://127.0.0.1:* https://127.0.0.1:* http://0.0.0.0 https://0.0.0.0 http://0.0.0.0:* https://0.0.0.0:* app://* file://* tauri://* vscode-webview://* vscode-file://*] OLLAMA_REMOTES:[ollama.com] OLLAMA_SCHED_SPREAD:false OLLAMA_VULKAN:false ROCR_VISIBLE_DEVICES: http_proxy: https_proxy: no_proxy:]"
time=2026-04-04T23:18:25.183Z level=INFO source=routes.go:1746 msg="Ollama cloud disabled: false"
time=2026-04-04T23:18:25.190Z level=INFO source=images.go:499 msg="total blobs: 31"
time=2026-04-04T23:18:25.190Z level=INFO source=images.go:506 msg="total unused blobs removed: 0"
time=2026-04-04T23:18:25.191Z level=INFO source=routes.go:1802 msg="Listening on [::]:11434 (version 0.20.2)"
time=2026-04-04T23:18:25.192Z level=INFO source=runner.go:67 msg="discovering available GPUs..."
time=2026-04-04T23:18:25.192Z level=INFO source=runner.go:106 msg="experimental Vulkan support disabled.  To enable, set OLLAMA_VULKAN=1"
time=2026-04-04T23:18:25.193Z level=INFO source=server.go:432 msg="starting runner" cmd="/usr/bin/ollama runner --ollama-engine --port 39497"
time=2026-04-04T23:18:25.468Z level=INFO source=server.go:432 msg="starting runner" cmd="/usr/bin/ollama runner --ollama-engine --port 41567"
time=2026-04-04T23:18:25.735Z level=INFO source=server.go:432 msg="starting runner" cmd="/usr/bin/ollama runner --ollama-engine --port 41599"
time=2026-04-04T23:18:25.735Z level=INFO source=server.go:432 msg="starting runner" cmd="/usr/bin/ollama runner --ollama-engine --port 35975"
time=2026-04-04T23:18:25.917Z level=INFO source=types.go:42 msg="inference compute" id=GPU-a66f63e7-5788-2e6e-1ebf-83dfcc1b6b4e filter_id="" library=CUDA compute=8.9 name=CUDA0 description="NVIDIA GeForce RTX 4060 Ti" libdirs=ollama,cuda_v13 driver=13.0 pci_id=0000:04:00.0 type=discrete total="16.0 GiB" available="14.9 GiB"
time=2026-04-04T23:18:25.917Z level=INFO source=routes.go:1852 msg="vram-based default context" total_vram="16.0 GiB" default_num_ctx=4096
For the hands-on demonstration, we will download and use the Google Gemma-4 4B model.
Open a new terminal window (referred to as T-1), execute the following docker command to download the Alibaba Qwen 3 4B LLM model:
$ docker exec -it ollama ollama run gemma4:e4b
The following should be the typical output:
pulling manifest
pulling 4c27e0f5b5ad: 100%  ||||||||||||||||||||||||||||||||||||||||||||||||||||||||||||||||||||  9.6 GB
pulling 7339fa418c9a: 100%  ||||||||||||||||||||||||||||||||||||||||||||||||||||||||||||||||||||   11 KB
pulling 56380ca2ab89: 100%  ||||||||||||||||||||||||||||||||||||||||||||||||||||||||||||||||||||    42 B
pulling f0988ff50a24: 100%  ||||||||||||||||||||||||||||||||||||||||||||||||||||||||||||||||||||   473 B
verifying sha256 digest
writing manifest
success
>>> Send a message (/? for help)
Open another new terminal window (referred to as T-2) and execute the following docker command to list all the downloaded LLM model(s):
$ docker exec -it ollama ollama list
The following should be the typical output:
NAME                      ID              SIZE      MODIFIED
gemma4:e4b                c6eb396dbd59    9.6 GB    42 hours ago
In the terminal window T-2, execute the following docker command to list the running LLM model:
$ docker exec -it ollama ollama ps
The following should be the typical output:
NAME          ID              SIZE     PROCESSOR    CONTEXT    UNTIL
gemma4:e4b    c6eb396dbd59    10 GB    100% GPU     8192       9 minutes from now
As is evident from the Output.5 above, the Google Gemma 4 4B LLM model is fully loaded and running on the GPU.
In the terminal window T-2, execute the following docker command to display information about the specific LLM model:
$ docker exec -it ollama ollama show gemma4:e4b
The following should be the typical output:
  Model
    architecture        gemma4
    parameters          8.0B
    context length      131072
    embedding length    2560
    quantization        Q4_K_M
    requires            0.20.0

  Capabilities
    completion
    vision
    audio
    tools
    thinking

  Parameters
    temperature    1
    top_k          64
    top_p          0.95

  License
    Apache License
    Version 2.0, January 2004
    ...
To test the just downloaded Google Gemma 4 4B LLM model, execute the following user prompt in the terminal window T-1:
>>> describe a gpu in less than 50 words in json format
The following should be the typical output:
````json
{
  "description": "A Graphics Processing Unit (GPU) is a specialized electronic circuit designed for rapid parallel processing.
It accelerates tasks like rendering, AI computations, and scientific simulations by utilizing thousands of small cores.",
  "word_count": 44
}
```
In the terminal window T-1, to exit the user input, execute the following user prompt:
>>> /bye
Now, we will shift gears to test the local API endpoint.
For Linux, open a new terminal window and execute the following command to list all the LLM models that are hosted in the running Ollama platform:
$ curl -s http://192.168.1.25:11434/api/tags | jq
For MacOS, open a new terminal window and execute the following command to list all the LLM models that are hosted in the running Ollama platform:
$ curl -s http://127.0.0.1:11434/api/tags | jq
The following should be the typical output on Linux:
{
  "models": [
    {
      "name": "gemma4:e4b",
      "model": "gemma4:e4b",
      "modified_at": "2026-04-03T00:21:36.48816497Z",
      "size": 9608350718,
      "digest": "c6eb396dbd5992bbe3f5cdb947e8bbc0ee413d7c17e2beaae69f5d569cf982eb",
      "details": {
        "parent_model": "",
        "format": "gguf",
        "family": "gemma4",
        "families": [
          "gemma4"
        ],
        "parameter_size": "8.0B",
        "quantization_level": "Q4_K_M"
      }
    }
  ]
}
From the Output.8 above, it is evident we have the one LLM model ready for use !
Moving along to the next task !
For Linux, to send a user prompt to the LLM model for a response, execute the following command:
$ curl -s http://192.168.1.25:11434/api/generate -d '{
  "model": "gpt-oss:20b",
  "prompt": "describe a gpu in less than 50 words",
  "stream": false
}' | jq
For MacOS, to send a user prompt to the LLM model for a response, execute the following command:
$ curl -s http://127.0.0.1:11434/api/generate -d '{
  "model": "gemma4:e4b",
  "prompt": "describe a gpu in less than 50 words",
  "stream": false
}' | jq
The following should be the typical trimmed output:
{
  "model": "gemma4:e4b",
  "created_at": "2026-04-05T01:02:56.481511669Z",
  "response": "A GPU (Graphics Processing Unit) is a specialized processor designed for rapid parallel computations. It excels at rendering complex graphics, simulations, and AI tasks by employing thousands of smaller cores working simultaneously.",
  "done": true,
  "done_reason": "stop",
  "context": [
    2,
    105,
    9731,
    107,
    98,
    106,
    107,
    105,
    2364,
    107,
    ... [ TRIM ] ...
    9395,
    684,
    41110,
    11252,
    529,
    7100,
    36876,
    2844,
    19639,
    236761
  ],
  "total_duration": 1076088150,
  "load_duration": 266342819,
  "prompt_eval_count": 25,
  "prompt_eval_duration": 85372733,
  "eval_count": 39,
  "eval_duration": 697942427
}
BAM - we have successfully tested the local API endpoints !
Now, we will test Ollama using Python code snippets.
Create a file called .env with the following environment variables defined:
LLM_TEMPERATURE=1.0
LLM_TOP_P=0.95
LLM_TOP_K=64
OLLAMA_BASE_URL='http://192.168.1.25:11434'
OLLAMA_LANG_MODEL='gemma4:e4b'
OLLAMA_STRUCT_MODEL='gemma4:e4b'
OLLAMA_TOOLS_MODEL='gemma4:e4b'
OLLAMA_VISION_MODEL='gemma4:e4b'
OLLAMA_AUDIO_MODEL='gemma4:e4b'
TEST_IMAGE='./data/test-image.png'
RECEIPT_IMAGE='./data/test-receipt.jpg'
TEST_AUDIO='./data/test-audio.wav'
Google Gemma4 recommends temperature=1.0, top_p=0.95, and top_k=64 for optimal performance !!!
To load the environment variables and assign them to corresponding Python variables, execute the following code snippet:
from dotenv import load_dotenv, find_dotenv

import os

load_dotenv(find_dotenv())

llm_temperature = float(os.getenv('LLM_TEMPERATURE'))
llm_top_p = float(os.getenv('LLM_TOP_P'))
llm_top_k = float(os.getenv('LLM_TOP_K'))
ollama_base_url = os.getenv('OLLAMA_BASE_URL')
ollama_lang_model = os.getenv('OLLAMA_LANG_MODEL')
ollama_struct_model = os.getenv('OLLAMA_STRUCT_MODEL')
ollama_tools_model = os.getenv('OLLAMA_TOOLS_MODEL')
ollama_vision_model = os.getenv('OLLAMA_VISION_MODEL')
ollama_audio_model = os.getenv('OLLAMA_AUDIO_MODEL')
test_image = os.getenv('TEST_IMAGE')
receipt_image = os.getenv('RECEIPT_IMAGE')
test_audio = os.getenv('TEST_AUDIO')
To initialize an instance of the client class for Ollama running on the host URL, execute the following code snippet:
from ollama import Client

client = Client(host=ollama_base_url)
To list all the LLM models that are hosted in the running Ollama platform, execute the following code snippet:
client.list()
The following should be the typical output:
ListResponse(models=[Model(model='gemma4:e4b', modified_at=datetime.datetime(2026, 4, 3, 0, 21, 36, 488164, tzinfo=TzInfo(0)), digest='c6eb396dbd5992bbe3f5cdb947e8bbc0ee413d7c17e2beaae69f5d569cf982eb', size=9608350718, details=ModelDetails(parent_model='', format='gguf', family='gemma4', families=['gemma4'], parameter_size='8.0B', quantization_level='Q4_K_M'))])
Note that one can pass various options to the LLM model running on the Ollama platform to control the model response. The following table summarizes some of the commonly used options:
| Option | Description |
|---|---|
| temperature | Controls randomness of token generation. Higher = more creative, lower= more deterministic. Default is 0.8 |
| seed | Random seed. Set a fixed value for reproducible outputs. 0 = random. Default is 0 |
| top_k | Reduces output to top K most likely tokens. Lower = more focused. 0 = disabled. Default is 40 |
| top_p | Considers tokens whose cumulative probability >= top_p. 1.0 = disabled. Default is 0.9 |
| num_ctx | Context window size (tokens). Larger = more context but more VRAM/RAM. Default is 2048 |
| num_thread | The number of CPU threads to use during generation. Defaults to physical core count |
To get a text response for a user prompt from the Google Gemma 4 4B LLM model running on the Ollama platform, execute the following code snippet:
result = client.chat(model=ollama_lang_model,
                     options={'temperature': llm_temperature},
                     messages=[{'role': 'user', 'content': 'Describe ollama in less than 50 words'}])
result.message.content
The following should be the typical output:
'Ollama is a user-friendly platform that simplifies running large language models (LLMs) locally on your computer. It provides a single API to manage, download, and run powerful open-source AI models, enabling developers to work with AI privately without relying on cloud services.'
For the next task, we will attempt to present the LLM model response in a structured form using a Pydantic data class. For that, we will first define a class object by executing the following code snippet:
from pydantic import BaseModel

class GpuSpecs(BaseModel):
  name: str
  bus: str
  memory: int
  clock: int
  cores: int
To receive a LLM model response in the desired format for the specific user prompt from the Ollama platform, execute the following code snippet:
result = client.chat(model=ollama_struct_model,
                     options={'temperature': llm_temperature},
                     messages=[{'role': 'user', 'content': 'Extract the GPU specifications for popular GPU Nvidia RTX 4070 Ti'}],
                     format=GpuSpecs.model_json_schema())
To display the results in the structred form, execute the following code snippet:
rtx_4070 = (GpuSpecs.model_validate_json(result.message.content))
rtx_4070
The following should be the typical output:
GpuSpecs(name='Nvidia GeForce RTX 4070 Ti', bus='PCI Express 4.0 x16', memory=12, clock=2700, cores=4352)
Moving along to the next task, we will now demonstrate the Optical Character Recognition (OCR) capabilities by processing the image of a Transaction Receipt !!!
Execute the following code snippet to define a method to convert a JPG image to base64 string, use it to convert the image of the receipt to a base64 string, and send a user prompt to the Ollama platform:
from io import BytesIO
from PIL import Image

import base64

def jpg_to_base64(image):
  jpg_buffer = BytesIO()
  pil_image = Image.open(image)
  pil_image.save(jpg_buffer, format='JPEG')
  return base64.b64encode(jpg_buffer.getvalue()).decode('utf-8')

result = client.chat(
  model=ollama_vision_model,
  messages=[
    {
        'role': 'user',
        'content': 'Itemize all the transactions from this receipt image in detail',
        'images': [jpg_to_base64(receipt_image)]
    }
  ]
)

print(result['message']['content'])
Executing the above Python code snippet generates the following typical output:
Based on the text provided, here is a detailed itemization of all transactions, categorized by account number and transaction type.

***

### DARTH VADER #1234: Transactions

| Transaction Date | Post Date | Description | Amount |
| :--- | :--- | :--- | :--- |
| Feb 17 | Feb 17 | AMAZON MKTPL\*N60Z9AF3Amz.com/billWA | $9.87 |
| Feb 18 | Feb 19 | AMAZON MKTPL\*L89W2J13Amzn.com/billWA | $29.99 |
| Feb 20 | Feb 21 | AMAZON RETA\*CI4EN8xC3WWW.AMAZON.COWA | $74.63 |
| **Subtotal** | | | **$114.49** |
| **Total Transactions** | | | **$132.91** |

***

### REY SKYWALKER #9876: Payments, Credits and Adjustments

*(This section represents adjustments or credits to the account.)*

| Transaction Date | Post Date | Description | Amount |
| :--- | :--- | :--- | :--- |
| Feb 15 | Feb 17 | (Credit/Adjustment) | **-$21.31** |

***

### REY SKYWALKER #9876: Transactions

*(This section lists the purchase transactions.)*

| Transaction Date | Post Date | Description | Amount |
| :--- | :--- | :--- | :--- |
| Feb 15 | Feb 17 | WEGMANS #93PRICETONNJ | $17.79 |
| Feb 15 | Feb 17 | PATEL BROTHERS EAST WINDSEAST WINDSORNJ | $77.75 |
| Feb 15 | Feb 17 | TJ MAXX #82EAST WINDSONRJ | $6.48 |
| Feb 15 | Feb 17 | WHOLEFDS PRN 10187PRINCETONNJ | $2.69 |
| Feb 15 | Feb 17 | TRADER JOE S #607PRINCETONNJ | $19.35 |
| Feb 16 | Feb 17 | SHOPRITE LAWRENCEVILLE SILAWRENCEVILLENJ | $30.16 |
| Feb 17 | Feb 18 | WEGMANS #93PRICETONNJ | $13.96 |
| Feb 17 | Feb 19 | HALO FARMLAWARENCEVILLENJ | $13.96 |
| **Total Transactions** | | | **$258.76** |

***
***
**Summary Notes:**
*   **DARTH VADER #1234:** The reported total is $132.91.
*   **REY SKYWALKER #9876:** The reported total is $258.76.
*   *(Note: There is a discrepancy between the sum of the listed transactions in the image and the stated total for DARTH VADER #1234, and a discrepancy in the amount listed for the final HALO FARML transaction vs. the grand total for REY SKYWALKER #9876. The amounts listed above reflect the data as provided on the receipt.)*
Cruising along to the next task, we will now demonstrate the Speech to Text functionality by processing the WAV audio file of a Speech !!!
Execute the following code snippet to convert the WAV audio to a base64 string and send it as a user prompt to the Ollama platform:
import base64

with open(test_audio, 'rb') as audio_file:
    base64_audio = base64.b64encode(audio_file.read()).decode('utf-8')

result = client.chat(
  model=ollama_vision_model,
  messages=[
    {
        'role': 'user',
        'content': 'Transcribe what you hear in the audio',
        'images': [base64_audio]
    }
  ]
)

print(result['message']['content'])
Notice that we are using the field images instead of the field audios to send the audio content - this is a *HACK* till Ollama fixes it !!!
Executing the above Python code snippet generates the following typical output:
There's a thought that the rainbow was caused by refraction of the sun's rays by the rain.
Finally to the next task, we will demonstrate the tool processing capabilities of the the Ollama platform.
Execute the following code snippet to create a custom tool for executing shell commands and reference it in the user prompt sent to the Ollama platform:
import subprocess

def execute_command(command: str) -> str:
  """
  tool to execute a given command and output its result

  Args:
    command (str): The command to execute

  Returns:
    str: The output from the command execution
  """
  print(f'Executing the command: {command}')
  try:
    result = subprocess.run(command, shell=True, check=True, text=True, capture_output=True)
    if result.returncode != 0:
      return f'Error executing the command - {command}'
    return result.stdout
  except subprocess.CalledProcessError as e:
    print(e)

prompt = """
Determine the ip address(es) of the primary network interface on this Linux system!
You have access to the following tool: {execute_command}
You can use the provided tool to answer the question, if necessary.
Only display the network interface and its ip address the primary network interface in the output - nothing more.
"""

result = client.chat(
  model=ollama_tools_model,
  messages=[{'role': 'user', 'content': prompt}],
  tools=[execute_command]
)

print(result['message']['tool_calls'])
if result.message.tool_calls:
  for tool in result.message.tool_calls:
    if tool.function.name == 'execute_command':
      print(f'Ready to call Func: {tool.function.name} with Args: {tool.function.arguments}')
      output = execute_command(**tool.function.arguments)
      print(f'Func output: {output}')
Executing the above Python code snippet generates the following typical output:
Ready to call Func: execute_command with Args: {'command': 'ip -4 addr show'}
Executing the command: ip -4 addr show
Func output: 1: lo: <LOOPBACK,UP,LOWER_UP> mtu 65536 qdisc noqueue state UNKNOWN group default qlen 1000
    inet 127.0.0.1/8 scope host lo
       valid_lft forever preferred_lft forever
2: enp42s0: <BROADCAST,MULTICAST,UP,LOWER_UP> mtu 1500 qdisc fq_codel state UP group default qlen 1000
    inet 192.168.1.25/24 brd 192.168.1.255 scope global noprefixroute enp42s0
       valid_lft forever preferred_lft forever
4: docker0: <BROADCAST,MULTICAST,UP,LOWER_UP> mtu 1500 qdisc noqueue state UP group default
    inet 172.17.0.1/16 brd 172.17.255.255 scope global docker0
       valid_lft forever preferred_lft forever
With this, we conclude the various demonstrations on using the Ollama platform for running and working with the pre-trained LLM models locally !!!
References