| PolarSPARC |
Quick Test :: Using Qwen-Image and Qwen-Image-Edit on a Local Machine
| Bhaskar S | *UPDATED*11/11/2025 |
Using Qwen-Image for Image Generation
In the following section, we will demonstrate how one can use the Qwen-Image text-to-image Diffusion model on a decent 8-core desktop with 64GB system memory and 16GB video memory NVidia GPU.
Ensure that Python 3.1x programming language is installed and setup on the desktop.
In addition, install the following necessary Python modules by executing the following command:
$ pip install accelerate diffusers huggingface_hub pillow torch
The first step is to download the Qwen-Image model from the HuggingFace repository to the default HuggingFace directory $HOME/.cache/huggingface on the desktop.
from huggingface_hub import snapshot_download

image_repo_id = 'Qwen/Qwen-Image'

snapshot_download(repo_id=image_repo_id)
The above code execution will take a few minutes to complete as the model needs to be downloaded to the desktop over the Internet.
With a 1 Gbps internet speed, the 'snapshot_download' command will take between 10 to 15 minutes to download the model !!!
Create a directory called /tmp/images where the model generated image would be stored.
Execute the following Python code snippet to run the text-to-image diffusion model:
from diffusers import DiffusionPipeline
import torch
image_dir = '/tmp/images'
num_inference_steps = 16
device = 'cpu'
torch_bfloat16 = torch.bfloat16
c_pipe = DiffusionPipeline.from_pretrained(image_repo_id, torch_dtype=torch_bfloat16)
c_pipe = c_pipe.to(device)
c_pipe.enable_sequential_cpu_offload()
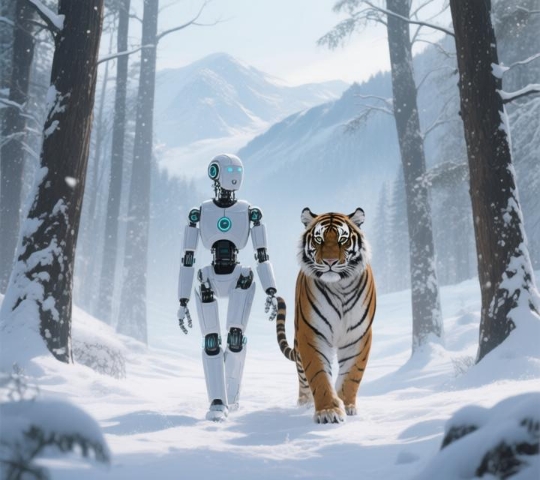
prompt = '''
A digital art of a robot and a tiger walking together, in a forest filled with snow, with mountains in the background
'''
image = c_pipe(
prompt=prompt,
height=640,
width=720,
output_type='pil',
num_inference_steps=num_inference_steps,
generator=torch.Generator(device).manual_seed(7)
).images[0]
image.save('/tmp/images/robot-tiger.jpg')
It is VERY IMPORTANT to use the float type of torch.bfloat16. Else will encounter RUNTIME ERRORS !!!
On the desktop with the specified specs, the model will leverage the CPU memory and typically run for about 5 mins before generating the desired image !!!
The following is the image generated by the Qwen-Image model for the specific prompt:
Execute the following Python code snippet to run the text-to-image diffusion model:
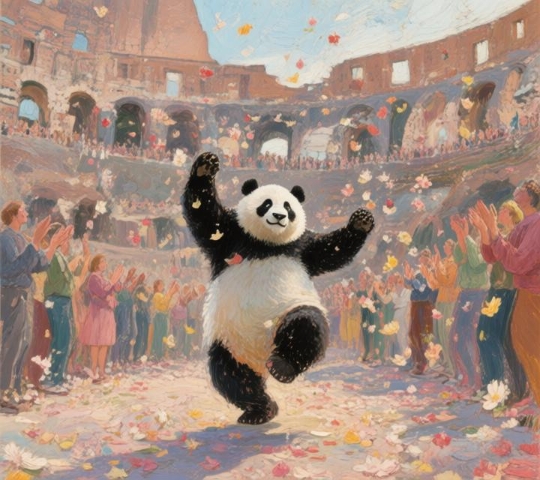
prompt = '''
A panda performing a dance in the center of Rome colosseum, with people clapping and showering flowers in the air. Render the image
in van gogh style
'''

image = c_pipe(
    prompt=prompt,
    height=640,
    width=720,
    output_type='pil',
    num_inference_steps=num_inference_steps,
    generator=torch.Generator(device).manual_seed(7)
).images[0]

image.save('/tmp/images/panda-dance.jpg')
The following is the image generated by the Qwen-Image model for the specific prompt:
The Qwen-Image model is pretty impressive in image generation !!!
Using Qwen-Image-Edit for Image Manipulation
Next, we will demonstrate how one can use the Qwen-Image-Edit image manipulation Diffusion model on a decent 8-core desktop with 64GB system memory.
Note that this model needs *AT LEAST* 24GB video RAM to effectively run on a NVidia GPU.
The first step is to download the Qwen-Image-Edit model from the HuggingFace repository to the default HuggingFace directory $HOME/.cache/huggingface on the desktop.
from huggingface_hub import snapshot_download

edit_repo_id = 'Qwen/Qwen-Image-Edit'

snapshot_download(repo_id=edit_repo_id)
The above code execution will take a few minutes to complete as the model needs to be downloaded to the desktop over the Internet.
With a 1 Gbps internet speed, the 'snapshot_download' command will take between 10 to 15 minutes to download the model !!!
We will use the directory /tmp/images for the model to look for images to edit and to store edited images.
Execute the following Python code snippet to run the image manipulation diffusion model:
from diffusers import QwenImageEditPipeline
from PIL import Image
import torch

num_inference_steps = 16
device = 'cpu'
torch_bfloat16 = torch.bfloat16

e_pipe = QwenImageEditPipeline.from_pretrained(edit_repo_id, torch_dtype=torch_bfloat)
e_pipe = e_pipe.to(device=device, torch_dtype=torch_bfloat)
e_pipe.enable_sequential_cpu_offload()

prompt = '''
Remove people from the given image
'''

image_file = '/tmp/images/torii-gate.jpg'
image = Image.open(img_dir + image_file).convert('RGB')

inputs = {
  'image': image,
  'prompt': prompt,
  'generator': torch.manual_seed(7),
  'num_inference_steps': num_inference_steps,
}

with torch.inference_mode():
    output = e_pipe(**inputs)
    output_image = output.images[0]
    output_image.save('/tmp/images/' + image_file[:-4] + '_1.jpg')
The image manipulation task is to remove people from the given image and on the desktop with the specified specs, the model will leverage the CPU memory and typically run for about 6 to 8 mins before generating a modified image !!!
The following illustration depicts the before and after images:

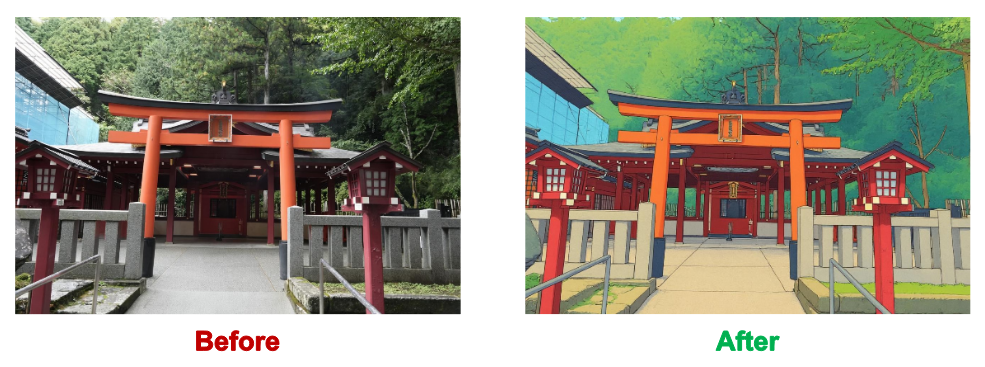
Let us try one more image manipulation task of generating a cartoon version of the image. Execute the following Python code snippet to run the image manipulation diffusion model:
prompt = '''
Convert the given image to a tintin herge style cartoon
'''

image_file = '/tmp/images/torii-gate_1.jpg'
image = Image.open(img_dir + image_file).convert('RGB')

inputs = {
  'image': image,
  'prompt': prompt,
  'generator': torch.manual_seed(7),
  'num_inference_steps': num_inference_steps,
}

with torch.inference_mode():
    output = e_pipe(**inputs)
    output_image = output.images[0]
    output_image.save('/tmp/images/' + image_file[:-4] + '_2.jpg')
The image manipulation task is to cartoonize the given image and on the desktop with the specified specs, the model will leverage the CPU memory and typically run for about 6 to 8 mins before generating the desired version of the image !!!
The following illustration depicts the before and after images:
The Qwen-Image-Edit model is quite impressive with image manipulation !!!
References