Figure.1
| PolarSPARC |
Hands-on Linux Virtual Ethernet (Veth)
| Bhaskar S | 01/24/2026 |
Overview
Most of us are familiar how networking works with physical machine(s) connected via a router. Ever wondered how networking works with container(s) ???
This is Virtual Networking in action !!!
In order to better understand virtual networking, one needs to first understand some important concepts in Linux.
A network namespace in Linux provides isolation of network resources, such as, interfaces, routing tables, firewall rules, network ports, etc., thereby enabling multiple container(s) or vm(s) to co-exist on a host system with their own isolated and private network environment.
A virtual ethernet device (or veth for short) in Linux are pairs of virtual network interfaces that are used for connecting two network namespaces in order to facilitate full duplex communication between them. Think of them as virtual ethernet cables connecting two network namespaces.
A bridge in Linux network operates at Layer 2 ( Data Link layer) of the OSI network model and acts like a virtual network switch, which enables two or more virtual interfaces communicate with one other as a single network segment.
Hands-on Virtual Ethernet (Veth)
All the commands will be executed on a Ubuntu 24.04 LTS based Linux desktop.
To list all the network namespaces in the system, execute the following command in a terminal window:
$ ip netns show
There will be no output as we have not defined any network namespaces yet !
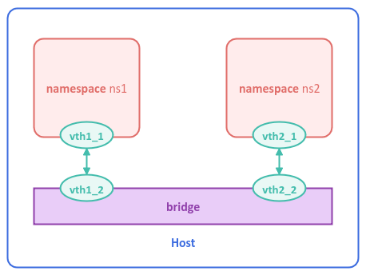
For the hands-on demonstration, we will setup the virtual network topology as shown in the illustration below:
To create the two network namespaces named ns1 and ns2, execute the following commands:
$ sudo ip netns add ns1
$ sudo ip netns add ns2
There will be no output.
To list all the network namespaces in the system, execute the following command in a terminal window:
$ ip netns show
The following would be a typical output:
ns2
ns1
To list all the veth interfaces in the system, execute the following command in a terminal window:
$ ip link show type veth
There will be no output as we have not defined any veth interfaces yet !
To create the two veth pairs starting with names vth1_x and vth2_x, execute the following commands:
$ sudo ip link add name vth1_1 type veth peer vth1_2
$ sudo ip link add name vth2_1 type veth peer vth2_2
There will be no output.
To list all the veth interfaces in the system, execute the following command in a terminal window:
$ ip link show type veth
The following would be a typical output:
5: vth1_2@vth1_1: <BROADCAST,MULTICAST,M-DOWN> mtu 1500 qdisc noop state DOWN mode DEFAULT group default qlen 1000
    link/ether 02:a8:b9:15:82:da brd ff:ff:ff:ff:ff:ff
6: vth1_1@vth1_2: <BROADCAST,MULTICAST,M-DOWN> mtu 1500 qdisc noop state DOWN mode DEFAULT group default qlen 1000
    link/ether 72:6f:16:6e:7c:3d brd ff:ff:ff:ff:ff:ff
7: vth2_2@vth2_1: <BROADCAST,MULTICAST,M-DOWN> mtu 1500 qdisc noop state DOWN mode DEFAULT group default qlen 1000
    link/ether 16:33:db:0d:8f:80 brd ff:ff:ff:ff:ff:ff
8: vth2_1@vth2_2: <BROADCAST,MULTICAST,M-DOWN> mtu 1500 qdisc noop state DOWN mode DEFAULT group default qlen 1000
    link/ether ca:2e:57:3a:3e:e2 brd ff:ff:ff:ff:ff:ff
To connect one of the pairs of each veth interface to the respective network namespaces, execute the following commands:
$ sudo ip link set dev vth1_1 netns ns1
$ sudo ip link set dev vth2_1 netns ns2
There will be no output.
To bring up each of the connected end of the veth interface, execute the following commands:
$ sudo ip -n ns1 link set dev vth1_1 up
$ sudo ip -n ns2 link set dev vth2_1 up
There will be no output.
To assign ip address to each of the connected end of the veth interface, execute the following commands:
$ sudo ip -n ns1 address add 192.168.5.1/24 dev vth1_1
$ sudo ip -n ns2 address add 192.168.5.2/24 dev vth2_1
There will be no output.
Now, to create a bridge named br0, execute the following command:
$ sudo ip link add name br0 type bridge
There will be no output.
To list all the bridges in the system, execute the following command in a terminal window:
$ ip link show type bridge
The following would be a typical output:
9: br0: <BROADCAST,MULTICAST> mtu 1500 qdisc noop state DOWN mode DEFAULT group default qlen 1000
    link/ether ea:10:9c:12:36:e1 brd ff:ff:ff:ff:ff:ff
To connect the other end of each of the veth interface to the bridge, execute the following commands:
$ sudo ip link set dev vth1_2 master br0
$ sudo ip link set dev vth2_2 master br0
There will be no output.
To bring up each of the just connected end of the veth interface to the bridge, execute the following commands:
$ sudo ip link set dev vth1_2 up
$ sudo ip link set dev vth2_2 up
There will be no output.
Finally, to bring up the bridge, execute the following command:
$ sudo ip link set dev br0 up
There will be no output.
To list all the interfaces including the bridges on the host, execute the following command:
$ ip link show
The following would be a typical output:
5: vth1_2@if6: <BROADCAST,MULTICAST,UP,LOWER_UP> mtu 1500 qdisc noqueue master br0 state UP mode DEFAULT group default qlen 1000
    link/ether 02:a8:b9:15:82:da brd ff:ff:ff:ff:ff:ff link-netns ns1
7: vth2_2@if8: <BROADCAST,MULTICAST,UP,LOWER_UP> mtu 1500 qdisc noqueue master br0 state UP mode DEFAULT group default qlen 1000
    link/ether 16:33:db:0d:8f:80 brd ff:ff:ff:ff:ff:ff link-netns ns2
9: br0: <BROADCAST,MULTICAST,UP,LOWER_UP> mtu 1500 qdisc noqueue state UP mode DEFAULT group default qlen 1000
    link/ether ea:10:9c:12:36:e1 brd ff:ff:ff:ff:ff:ff
As is evident from the Output.4 above, all the interfaces and the bridge are UP !
To check if one can the ip address 192.168.5.2 (which is in namespace ns2) from namespace ns1, execute the following command:
$ sudo ip netns exec ns1 ping -c 3 192.168.5.2
The following would be a typical output:
PING 192.168.5.2 (192.168.5.2) 56(84) bytes of data.
64 bytes from 192.168.5.2: icmp_seq=1 ttl=64 time=0.068 ms
64 bytes from 192.168.5.2: icmp_seq=2 ttl=64 time=0.109 ms
64 bytes from 192.168.5.2: icmp_seq=3 ttl=64 time=0.121 ms

--- 192.168.5.2 ping statistics ---
3 packets transmitted, 3 received, 0% packet loss, time 2072ms
rtt min/avg/max/mdev = 0.068/0.099/0.121/0.022 ms
Thats it - this concludes the hands-on demonstration of Linux virtual ethernet (veth) !!!