Figure.1
| PolarSPARC |
Understanding OAuth2 and OpenID Connect
| Bhaskar S | *UPDATED*04/26/2025 |
Overview
There seems to be a lot of confusion around OAuth2 and OpenID Connect (OIDC for short). In this article, we will go on a journey to understand and clarify what OAuth2 and OIDC really are.
Alice is hosting a party and wants to send an invite to a select group of friends. She plans to send a digital invitation via a site called KoolInvitez. The site needs a list of emails to send out the invitation. Alice stores all her contacts (as a collection of groups) in a site called EzGroupContacts. How should Alice provide access to the group called 'CloseFriends' in EzGroupContacts to KoolInvitez to send the invites ??? Should Alice provide her credentials for EzGroupContacts to KoolInvitez so it can access the contacts in the group 'CloseFriends' ??? This is a security anti-pattern and *NOT* recommended. This is where OAuth2 comes in handy. Think of OAuth2 as a way of handing someone a Valet key, who will have limited access to perform their task. In other words, OAuth2 is an open standard for users to grant access to their information on a site or application to another site, but without revealing their credentials.
OIDC, on the other hand, is an extension on top of OAuth2, that is used to verify the identify of a user (authentication) in a standard way. As an example, there are many sites that do not have any user registration and rely on Google or Facebook for identity verification (authentication).
Before we go any further, let us define some terms that will be useful in the context of OAuth2 and OIDC as follows:
| Term | Description |
|---|---|
| Resource | Data or information that a user owns (Ex: the contact list 'CloseFriends') |
| Resource Owner | The owner of a Resource (Ex: Alice) |
| Resource Server | The server where the Resource is hosted (Ex: EzGroupContacts) |
| Client | An application or a site that needs access to a user Resource (Ex: KoolInvitez) |
| Authorization Server | The OAuth2/ODIC server where a user grants a consent to a Client, to access their Resource(s) |
| Access Token | A security token which the Client can present to the Resource Server to get access to a user's Resource |
| Front Channel | Requests coming from a user agent (such as a web browser) to a server |
| Back Channel | Requests coming from a server to another server. This is done for security reasons |
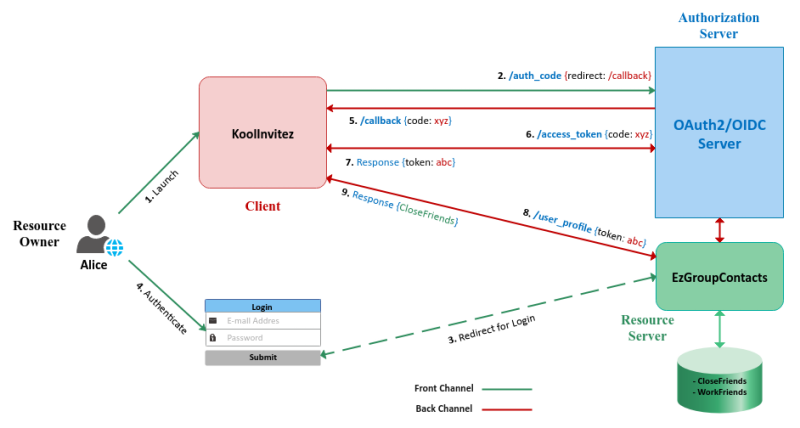
The basic *FUNDAMENTAL* flow of OAuth2 is referred to as the Authorization Code flow and all the other flows are variations of this basic flow. The Authorization Code flow works as follows:
1 :: the Resource Owner launches the Client to initiate the flow
2 :: the Client makes a request to the Authorization Server from the Front Channel for an authorization code (/auth_code) passing in an URL to respond back to (/callback ) at the Client
3 :: the Authorization Server redirects the Resource Owner to the Resource Server for user authentication and access grant
4 :: the Resource Owner enters valid credentials that is verified by the Resource Server and redirects back to the Authorization Server
5 :: the Authorization Server generates an Authorization Code and responds back to the Client with the authorization code on the Back Channel at the specified URL (/callback)
6 :: the Client makes a request to the Authorization Server for an Access Token through the Back Channel
7 :: the Authorization Server responds back to the Client with an Access Token on the Back Channel
8 :: the Client uses the Access Token to make a request to access the Resource at the Resource Server
9 :: the Resource Server responds with the data associated with the Resource
The following diagram illustrates the basic Authorization Code flow:
NOTE :: In some cases, the Authorization Server and the Resource Server may be ONE.
Installation and Setup
The installation will be on a Ubuntu 24.04 LTS based Linux desktop.
Ensure Docker is installed on the system. Else, follow the instructions provided in the article Introduction to Docker to complete the installation.
There are few open source implementations of the Authorization Server that implement the OAuth2/OIDC standards as follows:
For our setup and demonstration, we will use the Keycloak Authorization Server in conjuction with the PostgreSQL database.
Check the latest stable version for Postgres docker image. Version 17.4 was the latest at the time of this article.
To download the latest docker image for Postgres, execute the following command:
$ docker pull postgres:17.4
The following would be a typical output:
17.4: Pulling from library/postgres
8a628cdd7ccc: Already exists
e4847368ad17: Pull complete
97cdd47d9131: Pull complete
2817206b0512: Pull complete
3a6f8814136c: Pull complete
07db60713289: Pull complete
0c942aac37b1: Pull complete
8c63b71925de: Pull complete
97f28320a07a: Pull complete
2a08aad74366: Pull complete
6cea4d95608f: Pull complete
c1b7de8085d1: Pull complete
f15c43cffa70: Pull complete
6948dc7760c1: Pull complete
Digest: sha256:fe3f571d128e8efadcd8b2fde0e2b73ebab6dbec33f6bfe69d98c682c7d8f7bd
Status: Downloaded newer image for postgres:17.4
docker.io/library/postgres:17.4
Check the latest stable version for Keycloak docker image. Version 26.2 was the latest at the time of this article.
To download the latest docker image for Keycloak, execute the following command:
$ docker pull keycloak/keycloak:26.2
The following would be a typical output:
26.2: Pulling from keycloak/keycloak
d949f716ce77: Pull complete
8c577d69454d: Pull complete
9b46be75f4e8: Pull complete
9b751c10ff39: Pull complete
ecae49820766: Pull complete
Digest: sha256:87758ff2293c78c942c7a1f0df2bc13e0f943fcf0c0d027c12fdfac54a35d93b
Status: Downloaded newer image for keycloak/keycloak:26.2
docker.io/keycloak/keycloak:26.2
To create a new bridge network called my-iam-net, execute the following command:
$ docker network create my-iam-net
The following would be a typical output:
b67ca5859be5d691dc3fd1ea36d858b08b5f5afdbe18174c0f463a6aa978ce76
We will store the database files in the directory $HOME/Downloads/DATA/postgres on the host.
To start the Postgres database, execute the following command:
$ docker run -d --rm --name postgres --net my-iam-net -e POSTGRES_DB=keycloak -e POSTGRES_USER=keycloak -e POSTGRES_PASSWORD=keycloak\$123 -p 5432:5432 -v $HOME/Downloads/DATA/postgres:/var/lib/postgresql/data postgres:17.4
The following would be a typical output:
1ece53dcc021a0810a50b302f4f6081cdc299725ff635b305982878aca76ad58
To check the Postgres database logs, execute the following command:
$ docker logs postgres
The following would be a typical output:
...[SNIP]...
PostgreSQL init process complete; ready for start up.

2025-04-26 10:53:49.290 UTC [1] LOG:  starting PostgreSQL 17.4 (Debian 17.4-1.pgdg120+2) on x86_64-pc-linux-gnu, compiled by gcc (Debian 12.2.0-14) 12.2.0, 64-bit
2025-04-26 10:53:49.290 UTC [1] LOG:  listening on IPv4 address "0.0.0.0", port 5432
2025-04-26 10:53:49.290 UTC [1] LOG:  listening on IPv6 address "::", port 5432
2025-04-26 10:53:49.292 UTC [1] LOG:  listening on Unix socket "/var/run/postgresql/.s.PGSQL.5432"
2025-04-26 10:53:49.297 UTC [65] LOG:  database system was shut down at 2025-04-26 11:53:49 UTC
2025-04-26 10:53:49.302 UTC [1] LOG:  database system is ready to accept connections
Logs in the article have been trimmed to just show the pieces relevant to the context
The lines with three dots '...[SNIP]...' indicates code that has been truncated
To start the Keycloak OAuth2/ODIC server, execute the following command:
$ docker run --rm --name keycloak --net my-iam-net -e KC_DB=postgres -e KC_DB_URL="jdbc:postgresql://postgres:5432/keycloak" -e KC_DB_URL_HOST=postgres -e KC_DB_URL_PORT=5432 -e KC_DB_USERNAME=keycloak -e KC_DB_PASSWORD=keycloak\$123 -e KC_BOOTSTRAP_ADMIN_USERNAME=admin -e KC_BOOTSTRAP_ADMIN_PASSWORD=kc_admin\$123 -e KC_HTTP_ENABLED=true -e KC_HOSTNAME=localhost -p 8080:8080 keycloak/keycloak:26.2 start
The following would be a typical output:
Changes detected in configuration. Updating the server image.
Updating the configuration and installing your custom providers, if any. Please wait.
2025-04-26 11:59:04,183 INFO  [io.quarkus.deployment.QuarkusAugmentor] (main) Quarkus augmentation completed in 3457ms
Server configuration updated and persisted. Run the following command to review the configuration:

  kc.sh show-config

Next time you run the server, just run:

  kc.sh start --optimized

WARNING: Hostname v1 options [hostname-port] are still in use, please review your configuration
2025-04-26 10:59:07,410 INFO  [org.keycloak.quarkus.runtime.storage.database.liquibase.QuarkusJpaUpdaterProvider] (main) Initializing database schema. Using changelog META-INF/jpa-changelog-master.xml
2025-04-26 10:59:11,674 INFO  [org.keycloak.quarkus.runtime.storage.infinispan.CacheManagerFactory] (main) Starting Infinispan embedded cache manager
2025-04-26 10:59:11,677 INFO  [org.keycloak.quarkus.runtime.storage.infinispan.CacheManagerFactory] (main) JGroups JDBC_PING discovery enabled.
2025-04-26 10:59:11,956 INFO  [org.keycloak.quarkus.runtime.storage.infinispan.CacheManagerFactory] (main) JGroups Encryption enabled (mTLS).
2025-04-26 10:59:12,019 INFO  [org.infinispan.CONTAINER] (main) Virtual threads support enabled
2025-04-26 10:59:12,062 INFO  [org.keycloak.infinispan.module.certificates.CertificateReloadManager] (main) Starting JGroups certificate reload manager
2025-04-26 10:59:12,141 INFO  [org.infinispan.CONTAINER] (main) ISPN000556: Starting user marshaller 'org.infinispan.commons.marshall.ImmutableProtoStreamMarshaller'
2025-04-26 10:59:12,258 INFO  [org.infinispan.CLUSTER] (main) ISPN000078: Starting JGroups channel `ISPN` with stack `jdbc-ping`
2025-04-26 10:59:12,259 INFO  [org.jgroups.JChannel] (main) local_addr: 12ccdf8e-7a22-407f-8f8d-3f41686f2157, name: 00ff9c7ffa5c-9594
2025-04-26 10:59:12,265 INFO  [org.jgroups.protocols.FD_SOCK2] (main) server listening on *:57800
2025-04-26 10:59:12,268 INFO  [org.jgroups.protocols.pbcast.GMS] (main) 00ff9c7ffa5c-9594: no members discovered after 2 ms: creating cluster as coordinator
2025-04-26 10:59:12,280 INFO  [org.infinispan.CLUSTER] (main) ISPN000094: Received new cluster view for channel ISPN: [00ff9c7ffa5c-9594|0] (1) [00ff9c7ffa5c-9594]
2025-04-26 10:59:12,282 INFO  [org.keycloak.infinispan.module.certificates.CertificateReloadManager] (main) Reloading JGroups Certificate
2025-04-26 10:59:12,314 INFO  [org.infinispan.CLUSTER] (main) ISPN000079: Channel `ISPN` local address is `00ff9c7ffa5c-9594`, physical addresses are `[172.18.0.3:7800]`
2025-04-26 10:59:12,550 INFO  [org.keycloak.connections.infinispan.DefaultInfinispanConnectionProviderFactory] (main) Node name: 00ff9c7ffa5c-9594, Site name: null
2025-04-26 10:59:12,649 INFO  [org.keycloak.services] (main) KC-SERVICES0050: Initializing master realm
2025-04-26 10:59:13,576 INFO  [org.keycloak.services] (main) KC-SERVICES0077: Created temporary admin user with username admin
2025-04-26 10:59:13,662 INFO  [io.quarkus] (main) Keycloak 26.2.0 on JVM (powered by Quarkus 3.20.0) started in 9.260s. Listening on: http://0.0.0.0:8080
2025-04-26 10:59:13,662 INFO  [io.quarkus] (main) Profile prod activated.
2025-04-26 10:59:13,663 INFO  [io.quarkus] (main) Installed features: [agroal, cdi, hibernate-orm, jdbc-postgresql, keycloak, narayana-jta, opentelemetry, reactive-routes, rest, rest-jackson, smallrye-context-propagation, vertx]
Rather than execute the two docker commands individually, one can use the following docker-compose file:
networks:
  default:
    external:
      name: my-iam-net

services:
  postgres:
    container_name: postgres
    image: postgres:17.4
    volumes:
      - ${HOME}/Downloads/DATA/postgres:/var/lib/postgresql/data
    environment:
      - POSTGRES_DB=keycloak
      - POSTGRES_USER=keycloak
      - POSTGRES_PASSWORD=${POSTGRES_PASSWORD}
    ports:
      - 5432:5432

  keycloak:
    container_name: keycloak
    image: keycloak/keycloak:26.2
    environment:
      - KC_DB=postgres
      - KC_DB_URL=jdbc:postgresql://postgres:5432/keycloak
      - KC_DB_URL_HOST=postgres
      - KC_DB_URL_PORT=5432
      - KC_DB_USERNAME=keycloak
      - KC_DB_PASSWORD=${POSTGRES_PASSWORD}
      - KC_BOOTSTRAP_ADMIN_USERNAME=admin
      - KC_BOOTSTRAP_ADMIN_PASSWORD=${KEYCLOAK_PASSWORD}
      - KC_HTTP_ENABLED=true
      - KC_HOSTNAME=localhost
    command: start
    ports:
      - 8080:8080
    depends_on:
      - postgres
The variables POSTGRES_PASSWORD and KEYCLOAK_PASSWORD are defined in a file called vars.env as follows:
POSTGRES_PASSWORD=keycloak$123
KEYCLOAK_PASSWORD=kc_admin$123
To start both the Postgres database as well as the Keycloak server on the same bridge network called my-iam-net using docker-compose, execute the following command:
$ docker-compose --env-file vars.env -f postgres-keycloak.yml up
The following would be a typical trimmed output:
Creating postgres ... done
Creating keycloak ... done
Attaching to postgres, keycloak
[... SNIP ...]
postgres    | fixing permissions on existing directory /var/lib/postgresql/data ... ok
postgres    | creating subdirectories ... ok
postgres    | selecting dynamic shared memory implementation ... posix
postgres    | selecting default "max_connections" ... 100
postgres    | selecting default "shared_buffers" ... 128MB
postgres    | selecting default time zone ... Etc/UTC
postgres    | creating configuration files ... ok
postgres    | running bootstrap script ... ok
postgres    | performing post-bootstrap initialization ... ok
postgres    | syncing data to disk ... ok
[... SNIP ...]
postgres    | PostgreSQL init process complete; ready for start up.
postgres    |
postgres    | 2025-04-26 15:14:25.008 UTC [1] LOG:  starting PostgreSQL 17.4 (Debian 17.4-1.pgdg120+2) on x86_64-pc-linux-gnu, compiled by gcc (Debian 12.2.0-14) 12.2.0, 64-bit
postgres    | 2025-04-26 15:14:25.008 UTC [1] LOG:  listening on IPv4 address "0.0.0.0", port 5432
postgres    | 2025-04-26 15:14:25.008 UTC [1] LOG:  listening on IPv6 address "::", port 5432
postgres    | 2025-04-26 15:14:25.011 UTC [1] LOG:  listening on Unix socket "/var/run/postgresql/.s.PGSQL.5432"
postgres    | 2025-04-26 15:14:25.017 UTC [65] LOG:  database system was shut down at 2025-04-26 15:14:24 UTC
postgres    | 2025-04-26 15:14:25.025 UTC [1] LOG:  database system is ready to accept connections
keycloak    | 2025-04-26 15:14:28,720 INFO  [io.quarkus.deployment.QuarkusAugmentor] (main) Quarkus augmentation completed in 3474ms
[... SNIP ...]
keycloak    | 2025-04-26 15:14:31,948 INFO  [org.keycloak.quarkus.runtime.storage.database.liquibase.QuarkusJpaUpdaterProvider] (main) Initializing database schema. Using changelog META-INF/jpa-changelog-master.xml
keycloak    | 2025-04-26 15:14:36,089 INFO  [org.keycloak.quarkus.runtime.storage.infinispan.CacheManagerFactory] (main) Starting Infinispan embedded cache manager
keycloak    | 2025-04-26 15:14:36,092 INFO  [org.keycloak.quarkus.runtime.storage.infinispan.CacheManagerFactory] (main) JGroups JDBC_PING discovery enabled.
keycloak    | 2025-04-26 15:14:36,488 INFO  [org.keycloak.quarkus.runtime.storage.infinispan.CacheManagerFactory] (main) JGroups Encryption enabled (mTLS).
keycloak    | 2025-04-26 15:14:36,551 INFO  [org.infinispan.CONTAINER] (main) Virtual threads support enabled
keycloak    | 2025-04-26 15:14:36,616 INFO  [org.keycloak.infinispan.module.certificates.CertificateReloadManager] (main) Starting JGroups certificate reload manager
keycloak    | 2025-04-26 15:14:36,671 INFO  [org.infinispan.CONTAINER] (main) ISPN000556: Starting user marshaller 'org.infinispan.commons.marshall.ImmutableProtoStreamMarshaller'
keycloak    | 2025-04-26 15:14:36,787 INFO  [org.infinispan.CLUSTER] (main) ISPN000078: Starting JGroups channel `ISPN` with stack `jdbc-ping`
keycloak    | 2025-04-26 15:14:36,788 INFO  [org.jgroups.JChannel] (main) local_addr: 8d5cecac-840e-4d2d-9c7c-8aef892fa95f, name: 55523aff7bc4-16390
keycloak    | 2025-04-26 15:14:36,796 INFO  [org.jgroups.protocols.FD_SOCK2] (main) server listening on *:57800
keycloak    | 2025-04-26 15:14:36,799 INFO  [org.jgroups.protocols.pbcast.GMS] (main) 55523aff7bc4-16390: no members discovered after 2 ms: creating cluster as coordinator
keycloak    | 2025-04-26 15:14:36,813 INFO  [org.infinispan.CLUSTER] (main) ISPN000094: Received new cluster view for channel ISPN: [55523aff7bc4-16390|0] (1) [55523aff7bc4-16390]
keycloak    | 2025-04-26 15:14:36,814 INFO  [org.keycloak.infinispan.module.certificates.CertificateReloadManager] (main) Reloading JGroups Certificate
keycloak    | 2025-04-26 15:14:36,847 INFO  [org.infinispan.CLUSTER] (main) ISPN000079: Channel `ISPN` local address is `55523aff7bc4-16390`, physical addresses are `[172.18.0.3:7800]`
keycloak    | 2025-04-26 15:14:37,092 INFO  [org.keycloak.connections.infinispan.DefaultInfinispanConnectionProviderFactory] (main) Node name: 55523aff7bc4-16390, Site name: null
keycloak    | 2025-04-26 15:14:37,192 INFO  [org.keycloak.services] (main) KC-SERVICES0050: Initializing master realm
keycloak    | 2025-04-26 15:14:38,064 INFO  [org.keycloak.services] (main) KC-SERVICES0077: Created temporary admin user with username admin
keycloak    | 2025-04-26 15:14:38,148 INFO  [io.quarkus] (main) Keycloak 26.2.0 on JVM (powered by Quarkus 3.20.0) started in 9.208s. Listening on: http://0.0.0.0:8080
keycloak    | 2025-04-26 15:14:38,148 INFO  [io.quarkus] (main) Profile prod activated.
keycloak    | 2025-04-26 15:14:38,148 INFO  [io.quarkus] (main) Installed features: [agroal, cdi, hibernate-orm, jdbc-postgresql, keycloak, narayana-jta, opentelemetry, reactive-routes, rest, rest-jackson, smallrye-context-propagation, vertx]
To shutdown both the Postgres database as well as the Keycloak server, execute the following command:
$ docker-compose --env-file vars.env -f postgres-keycloak.yml down
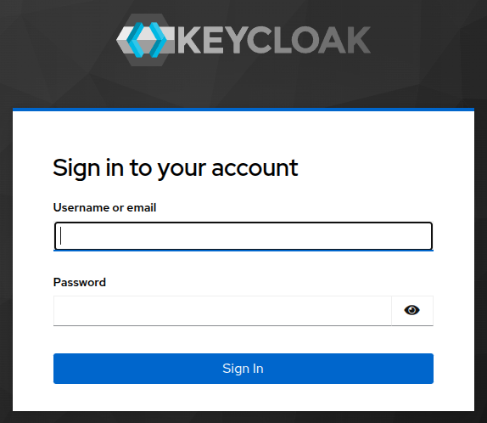
Launch a web browser and open the URL http://localhost:8080/admin. It will prompt us with a login screen as shown in the following illustration:
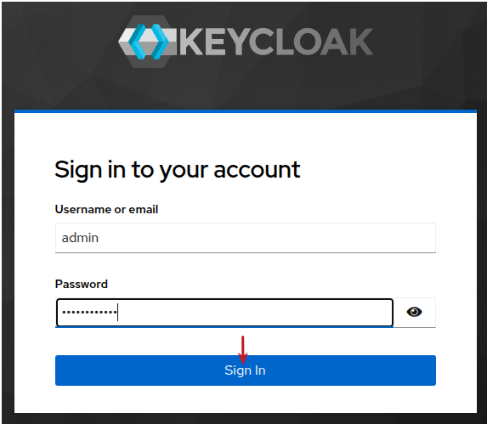
Enter the username of admin and password of kc_admin$123 and click on the Sign In button as shown in the illustration below:
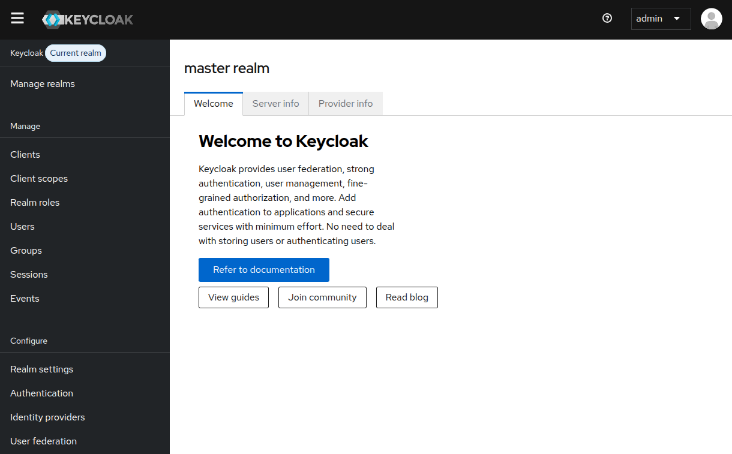
On successful login, it will take us to the Master realm page as shown in the illustration below:
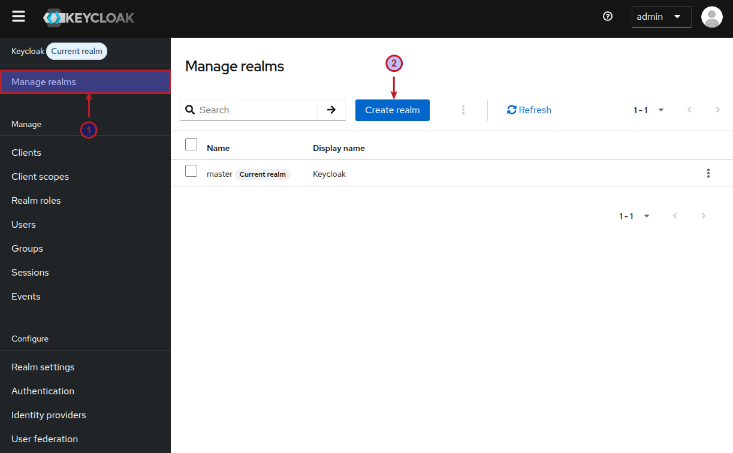
A Realm is like a namespace where all the instance setup objects reside. We need to create a new realm for our setup. To create a new realm click on Manage realms side menu iten (on the top left-hand corner) and click on the Create realm button as shown in the illustration below:
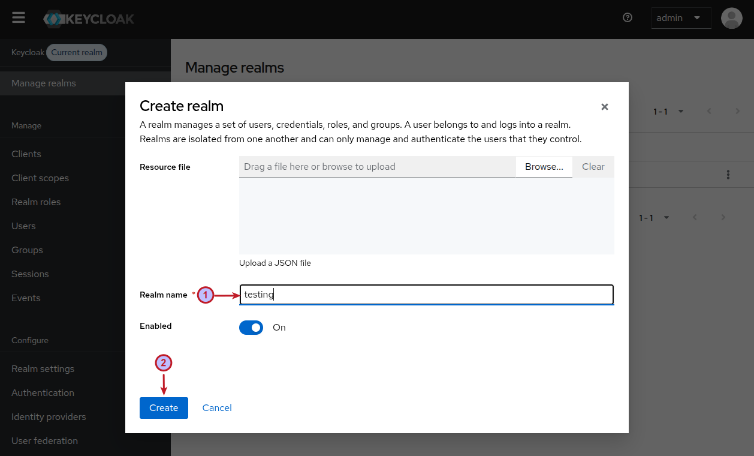
We will create a new realm called testing for our setup and click on the Create button as shown in the illustration below:
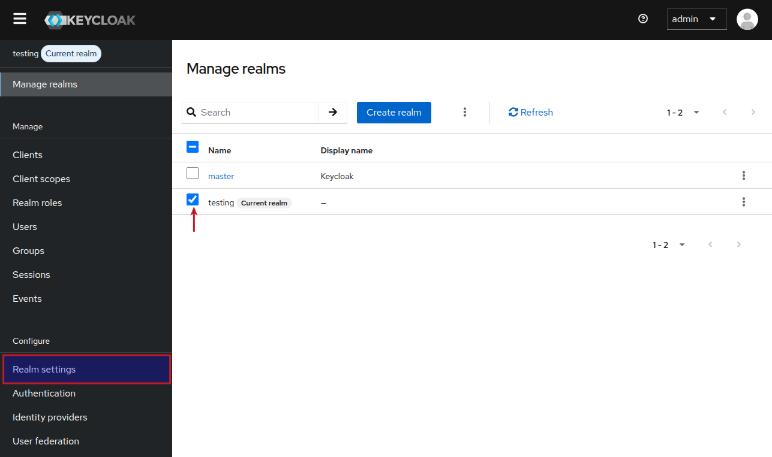
On successful creation, it will take us back to the Manage realms page. Choose the testing realm and click on the Realm settings menu item (on the left-hand side) as shown in the illustration below:
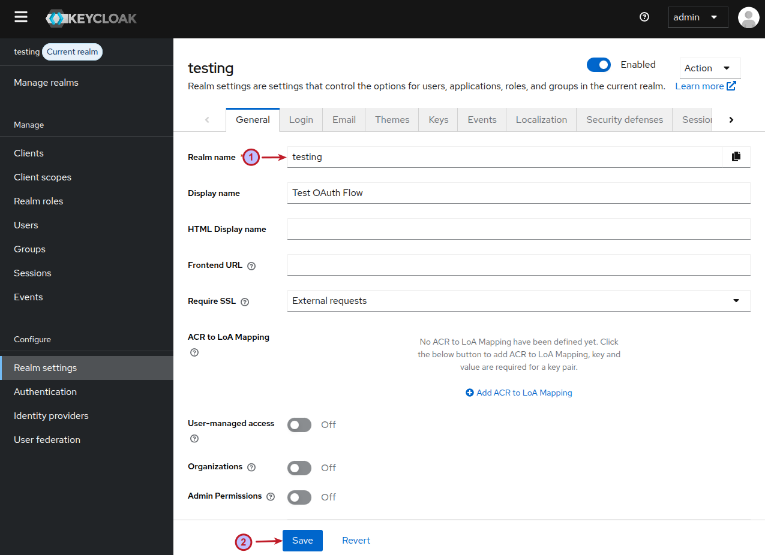
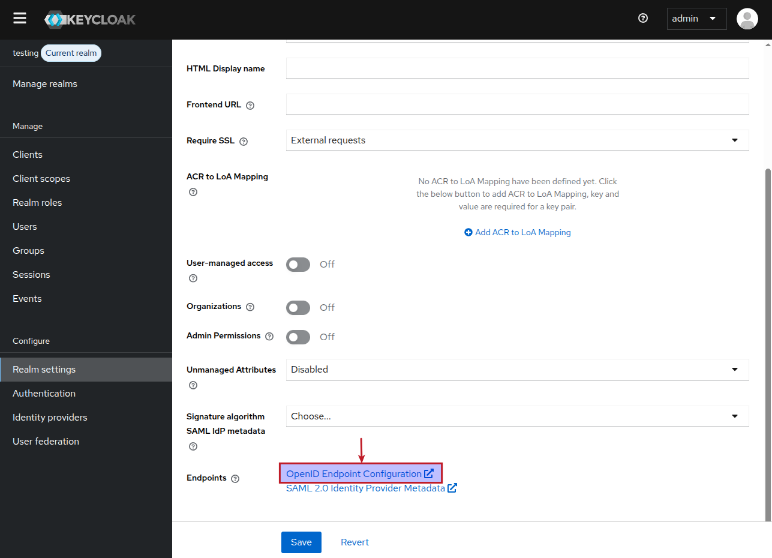
On the testing realms settings page, enter the Display name and leave the remaining options as is, and click on the Save button as shown in the illustration below:
Scroll to the bottom of the testing realms settings page and click on OpenID Endpoint Configuration endpoint as shown in the illustration below:
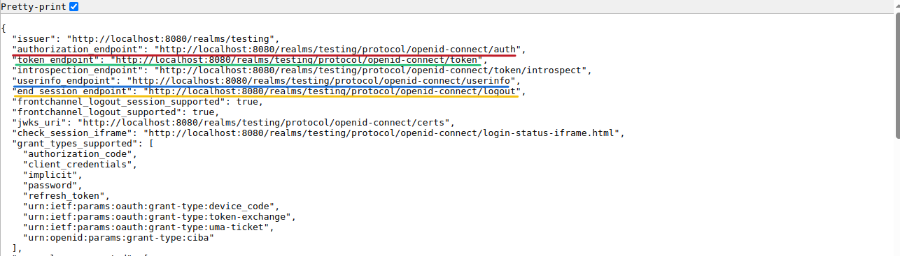
This will take us to the Endpoint Configuration page, where we can make a note of the various URL endpoints for our demonstration later, as shown in the illustration below:
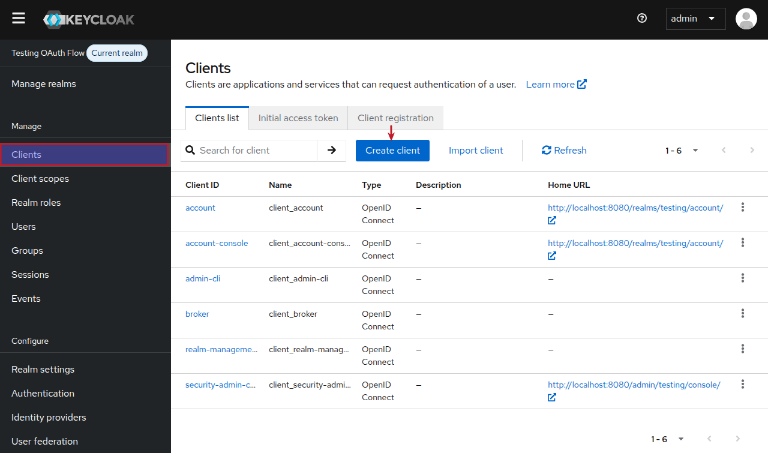
Every application that interacts with Keycloak needs to be pre-registered. To create a new client, click on the Clients menu item (on the left-hand side), and the click on the Create client button as shown in the illustration below:
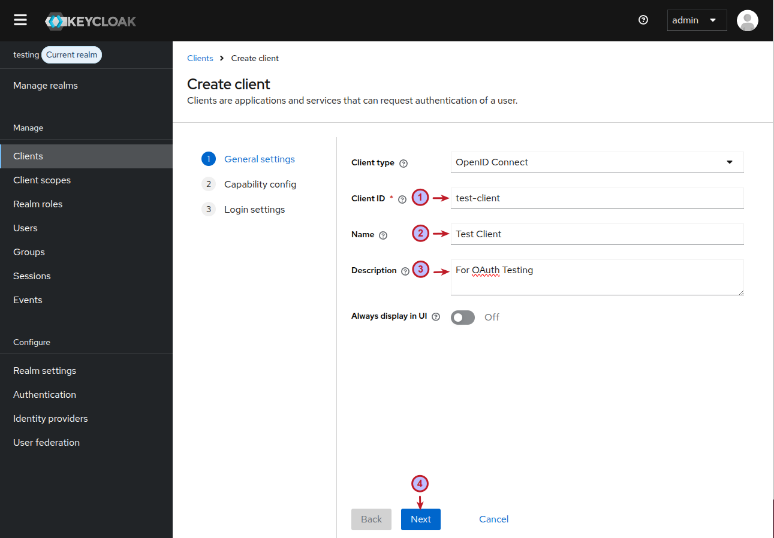
On the Create client page, we will leave the Client type as is, enter a new Client ID called test-client, followed by the Name, Description, and then click on the Next button as shown in the illustration below:
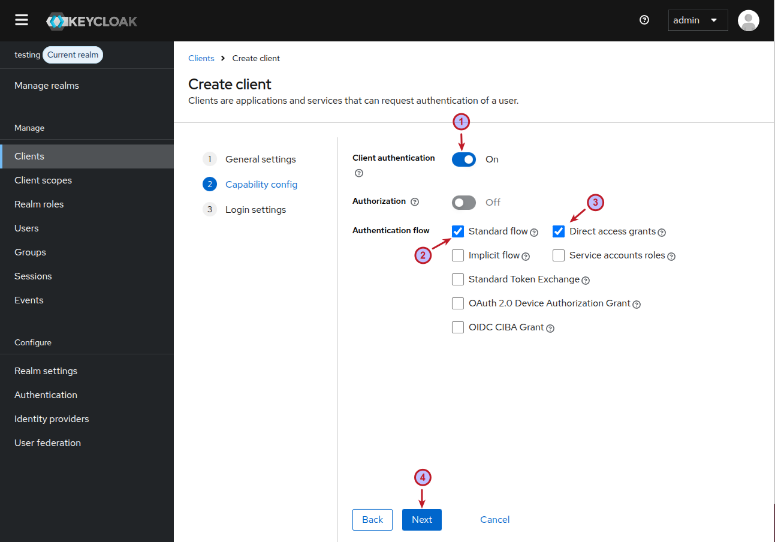
On the next Create client page, enable Client authentication, choose the option Standard flow and Direct access grants, and then click on the Next button as shown in the illustration below:
On the next Create client page, enter the Root URL value to be http://localhost:5000/, enter the Valid redirect URIs value to be http://localhost:5000/*, enter the Web origins value to be http://localhost:5000, and then finally click on the Save button as shown in the illustration below:

In Figure.14 above, the option Standard flow is what enables the OAuth2 flow.
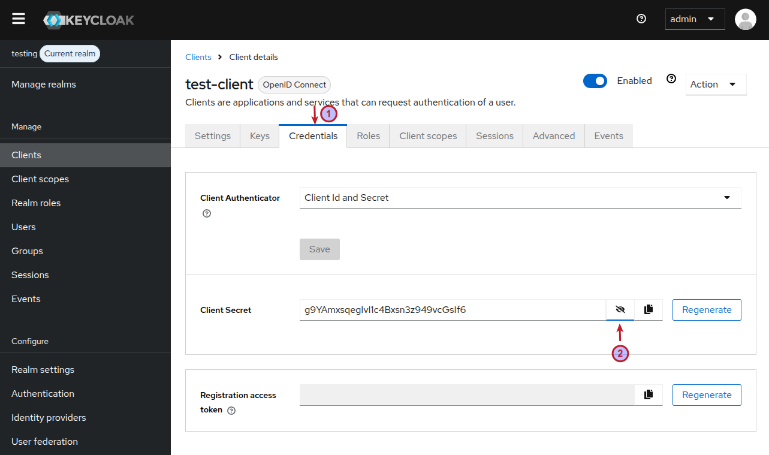
On successful client creation, we will end up on the client details page of the just created client called test-client. We need to make a note of the secret token associated with this client. To do that, click on the Credentials tab and then click on the Client Secret eye icon as shown in the illustration below:
For the OAuth2 flow to work in Keycloak, we need to pre-registered a user (Resource Owner). To create a new user, click on the Users menu item (on the left-hand side), and then click on the Create new user button as shown in the illustration below:

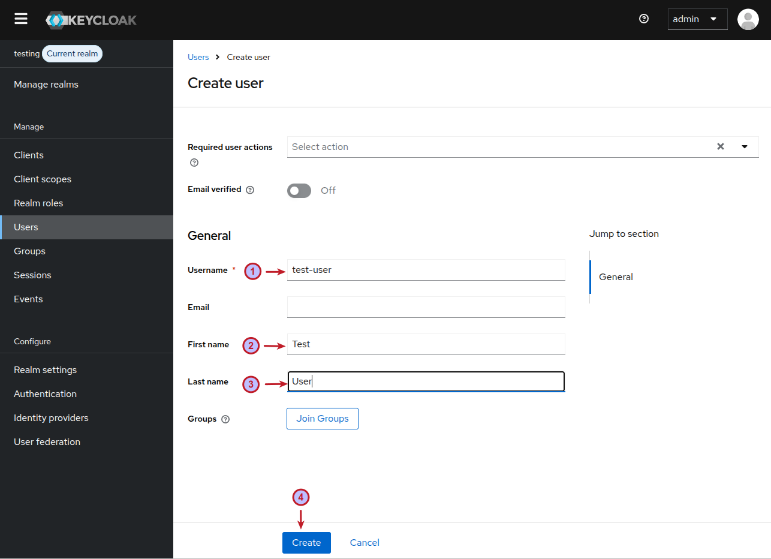
On the Create user page, we will enter the Username called test-user, with an Email as test-user@localhost, with a First Name as Test, with a Last Name as User, and click on the Create button as shown in the illustration below:
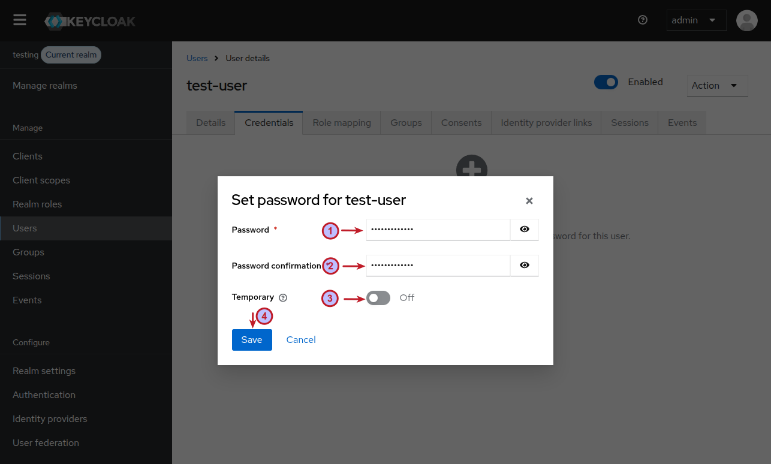
Next, we need to set a user credential (password) for the newly created user test-user. To set the user password, click on the Credentials tab, and then click on the Set password button. This will pop-up a window for us to enter a Password of test-user$123, re-enter the same password in Password confirmation, turn OFF the option Temporary, and then click on the Save button as shown in the illustration below:
This completes the installation and setup for the demonstration for the OAuth2 flow.
Hands-on OAuth2 Authorization Code Flow
This OAuth flow is sometimes referred to as the 3-Legged OAuth flow as it involves the three parties - the client, the authorization server, and the resource owner.
We will use Python to implement the Client (as a standalone webserver) and display the data elements of the OAuth2 Authorization Code flow on a simple HTML page.
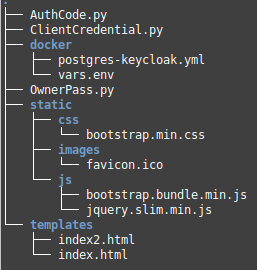
The following is the directory structure for the Client source code:
The following is the listing of the HTML file for the Authorization Code flow:
<!DOCTYPE html>
<html lang="en">
  <head>
    <!-- Required meta tags -->
    <meta charset="utf-8">
    <meta name="viewport" content="width=device-width, initial-scale=1, shrink-to-fit=no">
    <title>Understanding OAuth2</title>
    <link rel="stylesheet" href="../static/css/bootstrap.min.css">
    <link rel="shortcut icon" href="../static/images/favicon.ico">
    <style>
      td {
        white-space: normal !important;
        word-wrap: break-word;
      }
      table {
        table-layout: fixed;
      }
    </style>
  </head>
  <body class="bg-light">
    <div class="container">
      <br/>
      <div class="display-4 text-center text-secondary">Understanding OAuth2</div>
      <br/>
      <hr/>
      <nav class="nav nav-tabs nav-justified">
        <a id="code" class="nav-item nav-link" href="http://localhost:5000/auth_code">Authorization Code</a>
        <a id="token" class="nav-item nav-link" href="http://localhost:5000/access_token">Access Token</a>
        <a id="profile" class="nav-item nav-link" href="http://localhost:5000/user_profile">User Profile</a>
        <a id="logout" class="nav-item nav-link" href="http://localhost:5000/logout">Logout</a>
      </nav>
      <br/>
      <table class="table table-striped table-bordered">
        <thead>
          <tr class="bg-secondary text-light">
            <th width="20%">Key</th>
            <th width="80%">Value</th>
          </tr>
        </thead>
        <tbody>
          <tr>
            <td>State</td>
            <td>{{ data['state'] }}</td>
          </tr>
          <tr>
            <td>Authorization Code</td>
            <td id="a_code">{{ data['code'] }}</td>
          </tr>
          <tr>
            <td>Session</td>
            <td>{{ data['session'] }}</td>
          </tr>
          <tr>
            <td>Access Token</td>
            <td>{{ data['a_token'] }}</td>
          </tr>
          <tr>
            <td>Refresh Token</td>
            <td>{{ data['r_token'] }}</td>
          </tr>
          <tr>
            <td>Token Type</td>
            <td>{{ data['t_type'] }}</td>
          </tr>
          <tr>
            <td>Scope</td>
            <td>{{ data['scope'] }}</td>
          </tr>
          <tr>
            <td>User Email</td>
            <td>{{ data['email'] }}</td>
          </tr>
        </tbody>
      </table>
    </div>
    <script src="../static/js/jquery.slim.min.js"></script>
    <script src="../static/js/bootstrap.bundle.min.js"></script>
  </body>
</html>
The following is the listing of the Python Client for the Authorization Code flow:
###
# @Author: Bhaskar S
# @Blog:   https://polarsparc.github.io
# @Date:   26 Apr 2025
###

import requests
from flask import Flask, render_template, redirect, request
from urllib.parse import urlencode

app = Flask(__name__)

OAuthConfig = {
  'authURL': 'http://localhost:8080/realms/testing/protocol/openid-connect/auth?',
  'tokenURL': 'http://localhost:8080/realms/testing/protocol/openid-connect/token',
  'profileURL': 'http://localhost:8080/realms/testing/protocol/openid-connect/userinfo',
  'logoutURL': 'http://localhost:8080/realms/testing/protocol/openid-connect/logout?'
}

oauth = {
  'code': '',
  'state': '',
  'session': '',
  'a_token': '',
  'r_token': '',
  't_type': '',
  'scope': '',
  'email': ''
}

def oauth_init():
  oauth['code'] = ''
  oauth['state'] = ''
  oauth['session'] = ''
  oauth['a_token'] = ''
  oauth['r_token'] = ''
  oauth['t_type'] = ''
  oauth['scope'] = ''
  oauth['email'] = ''

@app.route('/')
def login():
  oauth_init()
  return render_template('index.html', data=oauth)

@app.route('/auth_code')
def authenticate():
  params = {'client_id': 'test-client',
            'response_type': 'code',
            'redirect_uri': 'http://localhost:5000/callback',
            'scope': 'openid'}
  query_str = urlencode(params)
  print(f"Ready to redirect to URL: {OAuthConfig['authURL'] + query_str}")
  return redirect(OAuthConfig['authURL'] + query_str, 302)

@app.route('/callback')
def callback():
  oauth['code'] = request.args.get('code')
  oauth['session'] = request.args.get('session_state')
  print(f"Received code: {oauth['code']}, session: {oauth['session']}, state: {request.args.get('state')}")
  return render_template('index.html', data=oauth)

@app.route('/access_token')
def token():
  data = {
    'client_id': 'test-client',
    'grant_type': 'authorization_code',
    'code': oauth['code'],
    'client_secret': 'g9YAmxsqegIvI1c4Bxsn3z949vcGsIf6',
    'redirect_uri': 'http://localhost:5000/callback'
  }
  res = requests.post(OAuthConfig['tokenURL'], data=data)
  print(f"Access Token - Status code: {res.status_code}")
  if res.status_code == 200:
    json = res.json()
    print(f"Received response: {json}")
    oauth['a_token'] = json['access_token']
    oauth['r_token'] = json['refresh_token']
    oauth['t_type'] = json['token_type']
    oauth['scope'] = json['scope']
  else:
    oauth['a_token'] = '*** FAILED ***'
  return render_template('index.html', data=oauth)

@app.route('/user_profile')
def profile():
  res = requests.get(OAuthConfig['profileURL'], headers={'Authorization': 'Bearer ' + oauth['a_token']})
  print(f"User Profile - Status code: {res.status_code}")
  if res.status_code == 200:
    json = res.json()
    print(f"Received response: {json}")
    oauth['email'] = json['email']
  else:
    oauth['email'] = '*** UNKNOWN ***'
  return render_template('index.html', data=oauth)

@app.route('/logout')
def logout():
    params = {'redirect_uri': 'http://localhost:5000/'}
    query_str = urlencode(params)
    return redirect(OAuthConfig['logoutURL'] + query_str)

if __name__ == '__main__':
  app.run(debug=True)
To start the Python Client AuthCode.py, execute the following command:
$ python ./AuthCode.py
The following would be a typical output:
 * Serving Flask app 'AuthCode'
* Debug mode: on
WARNING: This is a development server. Do not use it in a production deployment. Use a production WSGI server instead.
* Running on http://127.0.0.1:5000
Press CTRL+C to quit
* Restarting with stat
* Debugger is active!
* Debugger PIN: 316-284-951
Now, launch a web browser and open the URL http://localhost:5000. We will land on a page as shown in the illustration below:
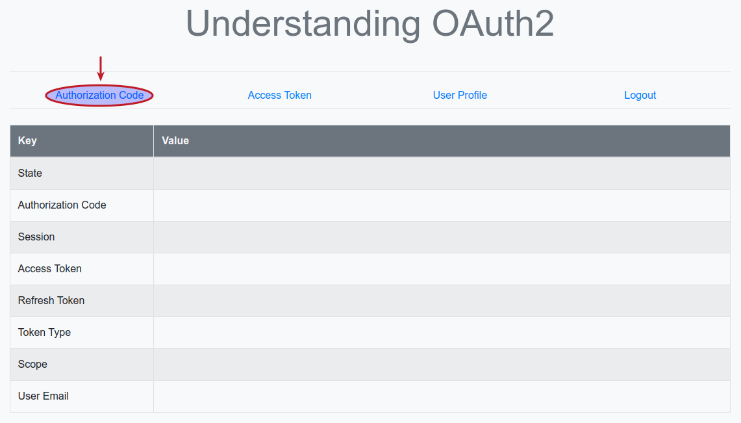
Clicking on the item Authorization Code triggers the execution of the Python method authenticate(), which sends a HTTP redirect request to the URL endpoint http://localhost:8080/realms/testing/protocol/openid-connect/auth on the Keycloak Authorization Server.
In our setup, the Keycloak instance acts as both the Authorization Server and the Resource Server. Once the Keycloak Authorization Server receives the authorization code request, it redirects the user (Resource Owner) to authenticate as shown in the illustration below:
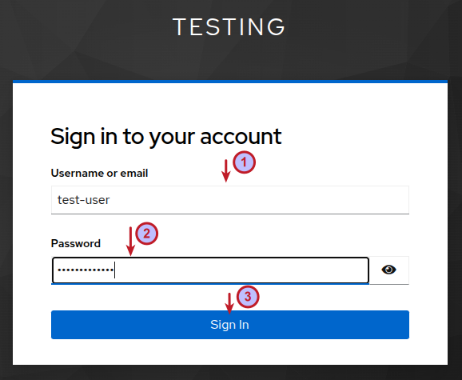
Enter the username of test-user and password of test-user$123 and click on the Sign In button.
On successful authentication, the Keycloak Authorization Server responds back on the callback URL of the Python Client http://localhost:5000/callback with a valid authorization code.
The browser now refreshes and we will land on a page as shown in the illustration below:
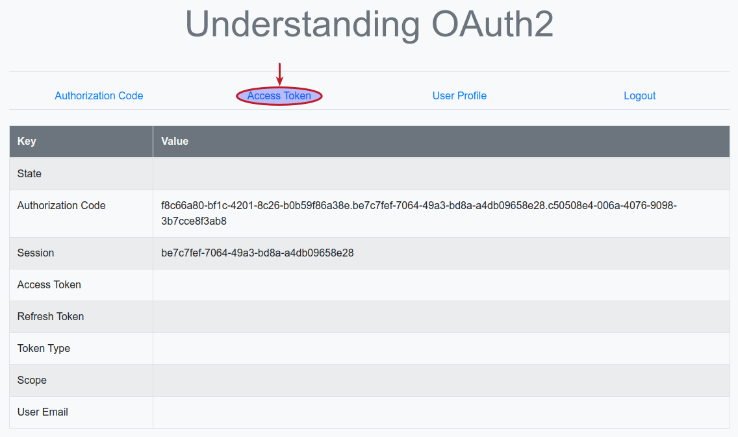
Next, clicking on the item Access Token triggers the execution of the Python method token(), which sends a HTTP POST request (with the authorization code and the Client secret) to the URL endpoint http://localhost:8080/realms/testing/protocol/openid-connect/token on the Keycloak Authorization Server.
On success, the Keycloak Authorization Server responds back with an Access Token to the Python Client.
The browser now refreshes and we will land on a page as shown in the illustration below:
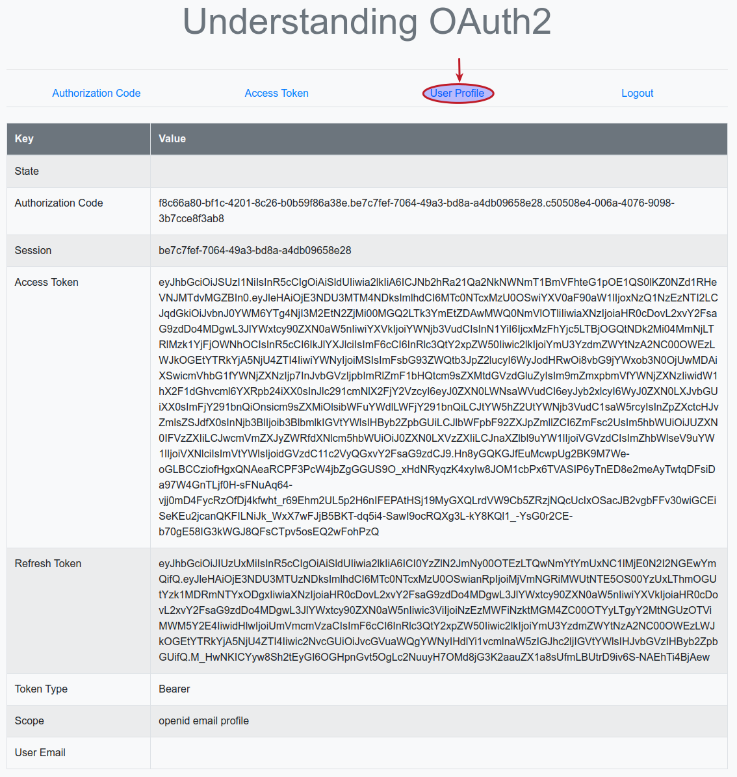
Next, clicking on the item User Profile triggers the execution of the Python method profile(), which sends a HTTP request (with the access token in the HTTP Authorization header as a Bearer token) to the URL endpoint http://localhost:8080/realms/testing/protocol/openid-connect/userinfo on the Keycloak Resource Server.
On success, the Keycloak Resource Server responds back with the profile information of the user (Resource Owner) which includes their email-id to the Python Client.
The browser now refreshes and we will land on a page as shown in the illustration below:
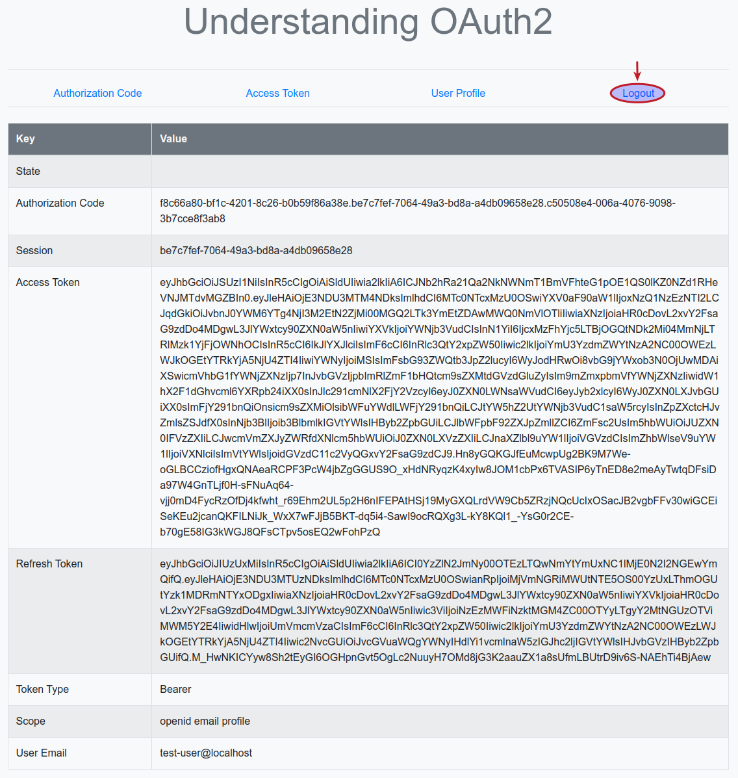
Finally, clicking on the item Logout triggers the execution of the Python method logout(), which sends a HTTP request to the URL endpoint http://localhost:8080/realms/testing/protocol/openid-connect/logout on the Keycloak Authorization Server to logout and terminate the active user session and invalidating the Access Token.
OAuth2 Implicit Grant Flow
The Implicit Grant flow is a simplified and *LESS* secure version of the OAuth2 flow, primarily targeted for a single-page JavaScript based application, to get an Access Token directly without getting an Authorization Code first and then exchaning for an Access Token. All interactions happen only via the Front Channel. The Implicit Grant flow is vulnerable to Access Token leakage (the token is returned in the URL and will be logged in the web browser's history) and replay attack (malicious reuse of an Access Token by an attacker). The Implicit Grant flow works as follows:
1 :: the Resource Owner launches the JavaScript Client application to initiate the flow
2 :: the Client makes a request to the Authorization Server from the Front Channel for an access token (skipping the authorization code step) passing in a request_type=token and a URL to respond back to (/callback) at the Client
3 :: the Authorization Server redirects the Resource Owner to the Resource Server for user authentication and access grant
4 :: the Resource Owner enters valid credentials that is verified by the Resource Server and redirects back to the Authorization Server
5 :: the Authorization Server directly generates an Access Token and responds back to the Client with the Access Token as a *FRAGMENT ID* in the specified URL ( /callback). This allows the JavaScript application in the web browser to have access to the token from the URL, but prevent the web browser from sending the Access Token to the web server
6 :: the Client uses the Access Token to make a request to access the Resource at the Resource Server
7 :: the Resource Server responds with the data associated with the Resource
We will *NOT* demonstrate this flow in this article.
OAuth2 Resource Owner Password Flow
The Resource Owner Password flow is targeted for use-cases where the Client is trusted by the user (Resource Owner) or migrating legacy Clients (using direct authentication schemes such as HTTP Basic or Digest) to get an Access Token directly in exchange for the username/password of the Resource Owner without getting an Authorization Code first and then exchaning for an Access Token. All interactions happen only via the Back Channel. The Resource Owner Password flow works as follows:
1 :: the Resource Owner launches the Client application to initiate the flow
2 :: the Client makes a request to the Authorization Server through the Back Channel for an access token (skipping the authorization code step) passing in a grant_type=password, the client id and secret, along with the username and password of the Resource Owner
3 :: the Authorization Server validates the Resource Owner credential and on success generates an Access Token and responds back to the Client (with the Access Token)
4 :: the Client uses the Access Token to make a request to access the Resource at the Resource Server
5 :: the Resource Server responds with the data associated with the Resource
The Resource Owner Password flow is *NOT* recommended as it uses the user's (Resource Owner) username and password on behalf of the user, which is impersonation (no way to know if the request was initiated by the Resource Owner or an attacker).
The following is the listing of the HTML file for both the Resource Owner Password and Client Credentials flows:
<!DOCTYPE html>
<html lang="en">
  <head>
    <!-- Required meta tags -->
    <meta charset="utf-8">
    <meta name="viewport" content="width=device-width, initial-scale=1, shrink-to-fit=no">
    <title>Understanding OAuth2 ({{ data['flow'] }})</title>
    <link rel="stylesheet" href="../static/css/bootstrap.min.css">
    <link rel="shortcut icon" href="../static/images/favicon.ico">
    <style>
      td {
        white-space: normal !important;
        word-wrap: break-word;
      }
      table {
        table-layout: fixed;
      }
    </style>
  </head>
  <body class="bg-light">
    <div class="container">
      <br/>
      <div class="display-4 text-center text-secondary">Understanding OAuth2 ({{ data['flow'] }})</div>
      <br/>
      <hr/>
      <nav class="nav nav-tabs nav-justified">
        <a id="token" class="nav-item nav-link" href="http://localhost:5000/access_token">Access Token</a>
        <a id="profile" class="nav-item nav-link" href="http://localhost:5000/user_profile">User Profile</a>
        <a id="logout" class="nav-item nav-link" href="http://localhost:5000/logout">Logout</a>
      </nav>
      <br/>
      <table class="table table-striped table-bordered">
        <thead>
          <tr class="bg-secondary text-light">
            <th width="20%">Key</th>
            <th width="80%">Value</th>
          </tr>
        </thead>
        <tbody>
          <tr>
            <td>Session</td>
            <td>{{ data['session'] }}</td>
          </tr>
          <tr>
            <td>Access Token</td>
            <td>{{ data['a_token'] }}</td>
          </tr>
          <tr>
            <td>Refresh Token</td>
            <td>{{ data['r_token'] }}</td>
          </tr>
          <tr>
            <td>Token Type</td>
            <td>{{ data['t_type'] }}</td>
          </tr>
          <tr>
            <td>Scope</td>
            <td>{{ data['scope'] }}</td>
          </tr>
          <tr>
            <td>User Email</td>
            <td>{{ data['email'] }}</td>
          </tr>
        </tbody>
      </table>
    </div>
    <script src="../static/js/jquery.slim.min.js"></script>
    <script src="../static/js/bootstrap.bundle.min.js"></script>
  </body>
</html>
The following is the listing of the Python Client for the Resource Owner Password flows:
###
# @Author: Bhaskar S
# @Blog:   https://polarsparc.github.io
# @Date:   26 Apr 2025
###

import requests
from flask import Flask, render_template, redirect
from urllib.parse import urlencode

app = Flask(__name__)

OAuthConfig = {
  'tokenURL': 'http://localhost:8080/realms/testing/protocol/openid-connect/token',
  'profileURL': 'http://localhost:8080/realms/testing/protocol/openid-connect/userinfo',
  'logoutURL': 'http://localhost:8080/realms/testing/protocol/openid-connect/logout?'
}

oauth = {
  'flow': 'Resource Owner',
  'session': '',
  'a_token': '',
  'r_token': '',
  't_type': '',
  'scope': '',
  'email': ''
}

def oauth_init():
  oauth['session'] = ''
  oauth['a_token'] = ''
  oauth['r_token'] = ''
  oauth['t_type'] = ''
  oauth['scope'] = ''
  oauth['email'] = ''

@app.route('/')
def login():
  oauth_init()
  return render_template('index2.html', data=oauth)

@app.route('/access_token')
def token():
  data = {
    'client_id': 'test-client',
    'client_secret': 'g9YAmxsqegIvI1c4Bxsn3z949vcGsIf6',
    'grant_type': 'password',
    'username': 'test-user',
    'password': 'test-user$123',
    'scope': 'openid',
  }
  res = requests.post(OAuthConfig['tokenURL'], data=data)
  print(f"Access Token - Status code: {res.status_code}")
  if res.status_code == 200:
    json = res.json()
    print(f"Received response: {json}")
    oauth['session'] = json['session_state']
    oauth['a_token'] = json['access_token']
    oauth['r_token'] = json['refresh_token']
    oauth['t_type'] = json['token_type']
    oauth['scope'] = json['scope']
  else:
    oauth['a_token'] = '*** FAILED ***'
  return render_template('index2.html', data=oauth)

@app.route('/user_profile')
def profile():
  res = requests.get(OAuthConfig['profileURL'], headers={'Authorization': 'Bearer ' + oauth['a_token']})
  print(f"User Profile - Status code: {res.status_code}")
  if res.status_code == 200:
    json = res.json()
    print(f"Received response: {json}")
    oauth['email'] = json['email']
  else:
    oauth['email'] = '*** UNKNOWN ***'
  return render_template('index2.html', data=oauth)

@app.route('/logout')
def logout():
  params = {'redirect_uri': 'http://localhost:5000/'}
  query_str = urlencode(params)
  return redirect(OAuthConfig['logoutURL'] + query_str)

if __name__ == '__main__':
  app.run(debug=True)
Stop the Python Client AuthCode.py if is already running, and start the Python Client OwnerPass.py to see this flow in action.
The following illustration shows the browser page after going through the items Access Token and User Profile:
OAuth2 Client Credentials Flow
This OAuth flow is sometimes referred to as the 2-Legged OAuth flow as it involves the two parties - the client (who is also the resource owner) and the authorization server.
The Client Credentials flow is targeted for use-cases where the Client is a service as well as a Resource Owner and wants to get an Access Token to access its own Resource. All interactions happen only via the Back Channel. The Client Credentials flow works as follows:
1 :: the Client makes a request to the Authorization Server through the Back Channel for an access token (skipping the authorization code step) passing in a grant_type=client_credentials along with the client id (service account) and secret
2 :: the Authorization Server validates the service account and on success generates an Access Token and responds back to the Client (with the Access Token)
3 :: the Client uses the Access Token to make a request to access its Resource at the Resource Server
4 :: the Resource Server responds with the data associated with the Resource
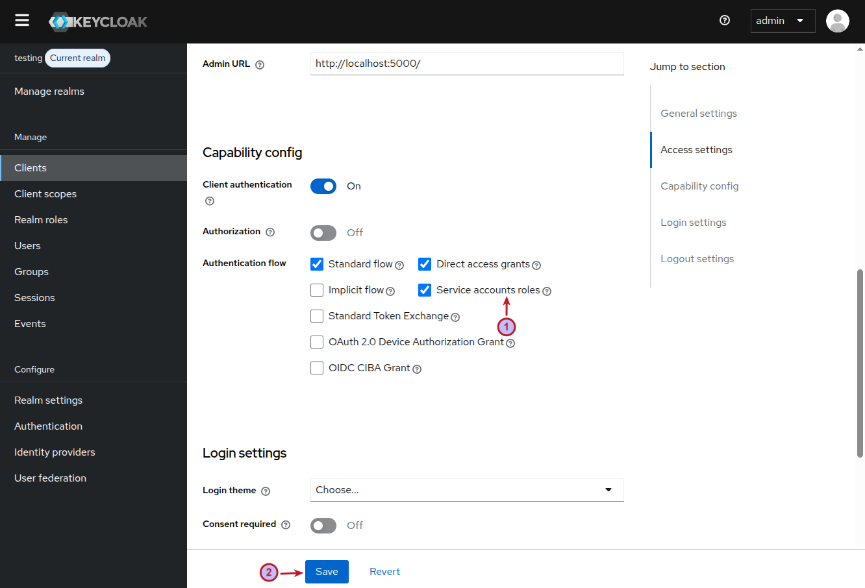
Before we proceed, we need to make a small change in the test-client client page. We need to enable the option Service accounts roles and click on the Save button as shown in the illustration below:
The following is the listing of the Python Client for the Client Credentials flow:
###
# @Author: Bhaskar S
# @Blog:   https://polarsparc.github.io
# @Date:   26 Apr 2026
###

import requests
from flask import Flask, render_template, redirect
from urllib.parse import urlencode

app = Flask(__name__)

OAuthConfig = {
  'tokenURL': 'http://localhost:8080/realms/testing/protocol/openid-connect/token',
  'profileURL': 'http://localhost:8080/realms/testing/protocol/openid-connect/userinfo',
  'logoutURL': 'http://localhost:8080/realms/testing/protocol/openid-connect/logout?'
}

oauth = {
  'flow': 'Client Credentials',
  'session': '',
  'a_token': '',
  'r_token': '',
  't_type': '',
  'scope': '',
  'email': ''
}

def oauth_init():
  oauth['session'] = ''
  oauth['a_token'] = ''
  oauth['r_token'] = ''
  oauth['t_type'] = ''
  oauth['scope'] = ''
  oauth['email'] = ''

@app.route('/')
def login():
  oauth_init()
  return render_template('index2.html', data=oauth)

@app.route('/access_token')
def token():
  data = {
    'client_id': 'test-client',
    'client_secret': 'g9YAmxsqegIvI1c4Bxsn3z949vcGsIf6',
    'grant_type': 'client_credentials',
    'scope': 'openid'
  }
  res = requests.post(OAuthConfig['tokenURL'], data=data)
  print(f"Status code: {res.status_code}")
  if res.status_code == 200:
    json = res.json()
    print(f"Received response: {json}")
    oauth['a_token'] = json['access_token']
    oauth['t_type'] = json['token_type']
    oauth['scope'] = json['scope']
  else:
    oauth['a_token'] = '*** FAILED ***'
  return render_template('index2.html', data=oauth)

@app.route('/user_profile')
def profile():
  res = requests.get(OAuthConfig['profileURL'], headers={'Authorization': 'Bearer ' + oauth['a_token']})
  print(f"Status code: {res.status_code}")
  if res.status_code == 200:
    json = res.json()
    print(f"Received response: {json}")
    # Service account - no email
    oauth['email'] = json['preferred_username']
  else:
    oauth['email'] = '*** UNKNOWN ***'
  return render_template('index2.html', data=oauth)

@app.route('/logout')
def logout():
  params = {'redirect_uri': 'http://localhost:5000/'}
  query_str = urlencode(params)
  return redirect(OAuthConfig['logoutURL'] + query_str)

if __name__ == '__main__':
  app.run(debug=True)
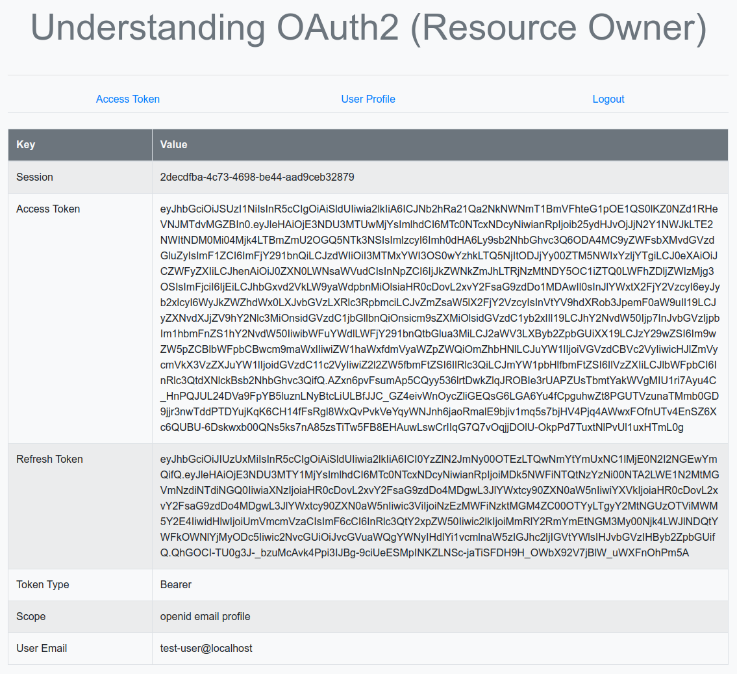
Stop the Python Client AuthCode.py or OwnerPass.py if is already running, and start the Python Client ClientCredential.py to see this flow in action.
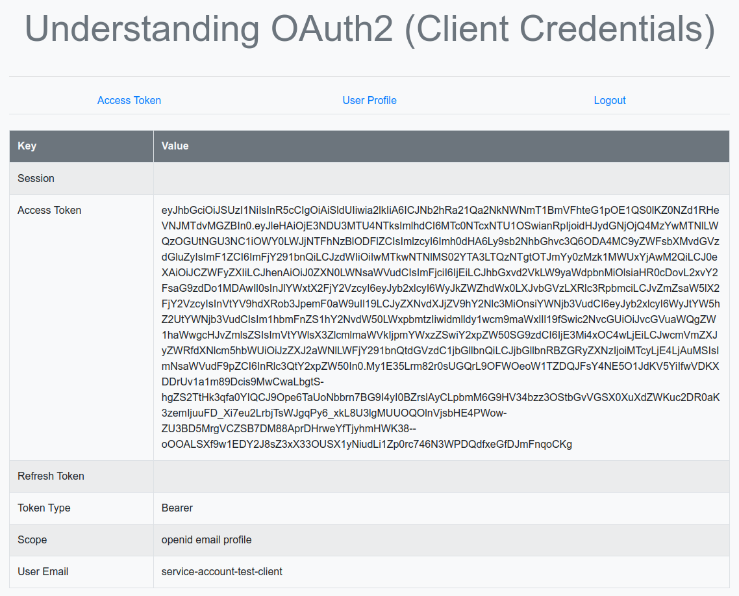
The following illustration shows the browser page after going through the items Access Token and User Profile:
This concludes our practical hands-on approach to understanding the OAuth2 and OpenID Connect standards.
The code in this article is to understand OAuth2 and OIDC flows - it is PURELY for learning purposes.
References
The OAuth 2.0 Authorization Framework
OAuth 2.0 Security Best Current Practice
OAuth 2.0 and OpenID Connect (in plain English)