Spark Architecture
| PolarSPARC |
Apache Spark 4.x Quick Notes :: Part - 2
| Bhaskar S | *UPDATED*11/28/2025 |
Spark Core Components
In Part-1 of this series, we introduced Apache Spark as a general purpose distributed computing engine for data processing on a cluster of commodity computers.
What does that really mean though ? Let us break it down ...
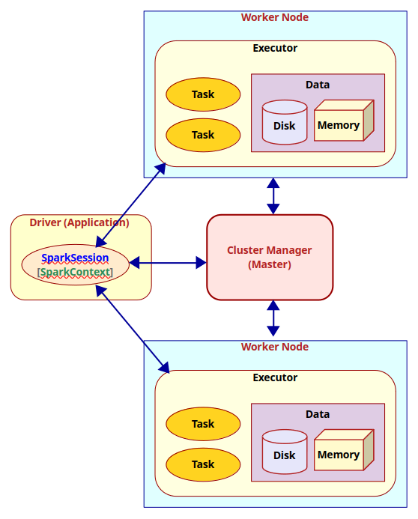
A Spark cluster consists of a Driver process running within the user's Application, a Cluster Manager running on the Master node, and Executor process(es) running within each of the Worker nodes. When a user Application submits a Spark job, the Driver communicates with the Master to determine the available Worker nodes with Executor(s). Next, the Driver partitions and distributes the job as task(s) to the available Executor process(es) (on the different Worker nodes) for further processing. As the application job executes, the Executor process(es) report back the state of the task(s) to the Driver process and thus the Driver maintains the overall status of the application job.
Ok - this explains the high-level view of the distributed compute cluster. How does the Driver process know which Executors are available for processing the task(s) and whom to distribute the tasks to ? This is where the Cluster Manager comes into play. The Cluster Manager keeps track of the state of the cluster resources (i.e., which Executor process(es) on which Worker nodes are available, etc).
The Driver process has a connection to the Cluster Manager via a SparkSession (or a SparkContext). SparkSession is a higher level wrapper around the SparkContext.
Hope this all makes sense at a high-level now.
The following diagram illustrates the core components and their interaction in Apache Spark:
The following table summarizes the core components of Apache Spark:
| Component | Description |
|---|---|
| SparkContext | Represents a connection to the cluster |
| SparkSession | Represents a unified higher level abstraction of the cluster |
| Driver | The process that creates and uses an instance of a SparkSession or a SparkContext |
| Worker Node | A node in the cluster that executes application code |
| Executor | A process that is launched for an application on a Worker Node to execute a unit of work (task) and to store data (in-memory and/or on-disk) |
| Task | A unit of work that is sent to an Executor |
| Cluster Manager | A service that is responsible for managing resources on the cluster. It decides which applications can use which Worker Node and accordingly lauches the Executor process |
Now that we have a basic understanding of the core components of Apache Spark, we can explain some of the variables we defined in the file $HOME/spark/conf/spark-env.sh during the installation and setup in Part-1 of this series.
The following are the variables along with their respective description:
| Variable | Description |
|---|---|
| SPARK_IDENT_STRING | A string representing a name for this instance of Spark |
| SPARK_DRIVER_MEMORY | Memory allocated for the Driver process |
| SPARK_EXECUTOR_CORES | The number of CPU cores for use by the Executor process(es) |
| SPARK_EXECUTOR_MEMORY | Memory allocated for each Executor process |
| SPARK_LOCAL_IP | The IP address used by the Driver and Executor to bind to on this node |
| SPARK_LOCAL_DIRS | The directory to use on this node for storing data |
| SPARK_MASTER_HOST | The IP address used by the Master to bind to on this node |
| SPARK_WORKER_CORES | The total number of CPU cores to allow the Worker Node to use on this node |
| SPARK_WORKER_MEMORY | The total amount of memory to allow the Worker Node to use on this node |
| SPARK_WORKER_DIR | The temporary directory to use on this node by the Worker Node |
| SPARK_EXECUTOR_INSTANCES | The number of Worker Nodes to start on this node |
Now that we have a good handle on the basics of Apache Spark, let us proceed to setup and leverage the Standalone Cluster to run Spark jobs.
Setup Standalone Cluster
For the hands-on demonstration, we will create a custom text file with some paragraphs about Spark, which can be downloaded from HERE !!!
Let us assume the IP address of the Linux desktop to be 192.168.1.25 with the host name of vader.
In the directory $HOME/spark/conf, edit the configuration file called spark-defaults.conf to have the following contents:
# This is useful for setting default environmental settings.

spark.log.level     INFO
spark.master        spark://192.168.1.25:7077
spark.driver.host   192.168.1.25
The parameter spark.driver.host is very important if we want to deploy the Master or Worker(s) on different hosts !!!
For the hands-on demonstration, we will be deploying a Standalone cluster with one Master and one Worker, both running on the host 192.168.1.25.
To start the Spark Master node running the Standalone Cluster Nanager, execute the following command in a terminal window:
$ docker run --rm --name spark-master --network host -u $(id -u $USER):$(id -g $USER) -v $HOME/spark/conf:/opt/spark/conf -v $HOME/spark/logs:/opt/spark/logs -it ps-spark:v4.0.1 /opt/spark/sbin/start-master.sh
The following should be the typical output:
starting org.apache.spark.deploy.master.Master, logging to /opt/spark/logs/spark-MySparkCluster-org.apache.spark.deploy.master.Master-1-vader.out
Spark Command: /opt/java/openjdk/bin/java -cp /opt/spark/conf/:/opt/spark/jars/slf4j-api-2.0.16.jar:/opt/spark/jars/* -Xmx1g -XX:+IgnoreUnrecognizedVMOptions --add-modules=jdk.incubator.vector --add-opens=java.base/java.lang=ALL-UNNAMED --add-opens=java.base/java.lang.invoke=ALL-UNNAMED --add-opens=java.base/java.lang.reflect=ALL-UNNAMED --add-opens=java.base/java.io=ALL-UNNAMED --add-opens=java.base/java.net=ALL-UNNAMED --add-opens=java.base/java.nio=ALL-UNNAMED --add-opens=java.base/java.util=ALL-UNNAMED --add-opens=java.base/java.util.concurrent=ALL-UNNAMED --add-opens=java.base/java.util.concurrent.atomic=ALL-UNNAMED --add-opens=java.base/jdk.internal.ref=ALL-UNNAMED --add-opens=java.base/sun.nio.ch=ALL-UNNAMED --add-opens=java.base/sun.nio.cs=ALL-UNNAMED --add-opens=java.base/sun.security.action=ALL-UNNAMED --add-opens=java.base/sun.util.calendar=ALL-UNNAMED --add-opens=java.security.jgss/sun.security.krb5=ALL-UNNAMED -Djdk.reflect.useDirectMethodHandle=false -Dio.netty.tryReflectionSetAccessible=true org.apache.spark.deploy.master.Master --host vader --port 7077 --webui-port 8080
========================================
WARNING: Using incubator modules: jdk.incubator.vector
Using Spark's default log4j profile: org/apache/spark/log4j2-defaults.properties
25/11/27 12:56:55 INFO Master: Started daemon with process name: 16@vader
25/11/27 12:56:55 INFO SignalUtils: Registering signal handler for TERM
25/11/27 12:56:55 INFO SignalUtils: Registering signal handler for HUP
25/11/27 12:56:55 INFO SignalUtils: Registering signal handler for INT
25/11/27 12:56:56 WARN NativeCodeLoader: Unable to load native-hadoop library for your platform... using builtin-java classes where applicable
Using Spark's default log4j profile: org/apache/spark/log4j2-defaults.properties
25/11/27 12:56:56 INFO SecurityManager: Changing view acls to: alice
25/11/27 12:56:56 INFO SecurityManager: Changing modify acls to: alice
25/11/27 12:56:56 INFO SecurityManager: Changing view acls groups to: alice
25/11/27 12:56:56 INFO SecurityManager: Changing modify acls groups to: alice
25/11/27 12:56:56 INFO SecurityManager: SecurityManager: authentication disabled; ui acls disabled; users with view permissions: alice groups with view permissions: EMPTY; users with modify permissions: alice; groups with modify permissions: EMPTY; RPC SSL disabled
25/11/27 12:56:56 INFO Utils: Successfully started service 'sparkMaster' on port 7077.
25/11/27 12:56:56 INFO Master: Starting Spark master at spark://vader:7077
25/11/27 12:56:56 INFO Master: Running Spark version 4.0.1
25/11/27 12:56:56 INFO JettyUtils: Start Jetty 0.0.0.0:8080 for MasterUI
25/11/27 12:56:56 INFO Utils: Successfully started service 'MasterUI' on port 8080.
25/11/27 12:56:56 INFO MasterWebUI: Bound MasterWebUI to 0.0.0.0, and started at http://vader:8080
25/11/27 12:56:56 INFO Master: I have been elected leader! New state: ALIVE
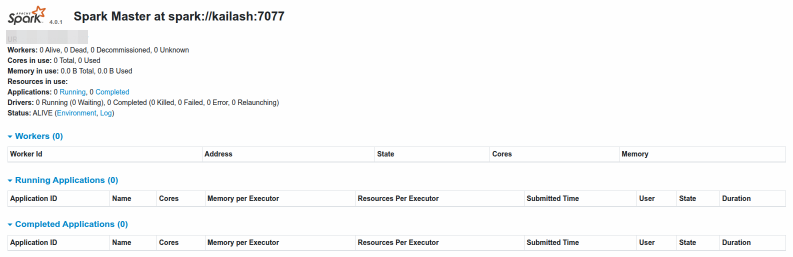
Open the web browser and navigate to the URL http://192.168.1.25:8080 to launch the Spark Master Web UI.
The following illustration depicts the Spark Master web UI:
Next, to start a Spark Worker node, execute the following command in a second terminal window:
$ docker run --rm --name spark-worker --network host -u $(id -u $USER):$(id -g $USER) -v $HOME/spark/conf:/opt/spark/conf -v $HOME/spark/data:/opt/spark/data -v $HOME/spark/logs:/opt/spark/logs -v $HOME/spark/work-dir:/opt/spark/work-dir -it ps-spark:v4.0.1 /opt/spark/sbin/start-worker.sh spark://192.168.1.25:7077
The following should be the typical output:
starting org.apache.spark.deploy.worker.Worker, logging to /opt/spark/logs/spark-MySparkCluster-org.apache.spark.deploy.worker.Worker-1-vader.out
Spark Command: /opt/java/openjdk/bin/java -cp /opt/spark/conf/:/opt/spark/jars/slf4j-api-2.0.16.jar:/opt/spark/jars/* -Xmx1g -XX:+IgnoreUnrecognizedVMOptions --add-modules=jdk.incubator.vector --add-opens=java.base/java.lang=ALL-UNNAMED --add-opens=java.base/java.lang.invoke=ALL-UNNAMED --add-opens=java.base/java.lang.reflect=ALL-UNNAMED --add-opens=java.base/java.io=ALL-UNNAMED --add-opens=java.base/java.net=ALL-UNNAMED --add-opens=java.base/java.nio=ALL-UNNAMED --add-opens=java.base/java.util=ALL-UNNAMED --add-opens=java.base/java.util.concurrent=ALL-UNNAMED --add-opens=java.base/java.util.concurrent.atomic=ALL-UNNAMED --add-opens=java.base/jdk.internal.ref=ALL-UNNAMED --add-opens=java.base/sun.nio.ch=ALL-UNNAMED --add-opens=java.base/sun.nio.cs=ALL-UNNAMED --add-opens=java.base/sun.security.action=ALL-UNNAMED --add-opens=java.base/sun.util.calendar=ALL-UNNAMED --add-opens=java.security.jgss/sun.security.krb5=ALL-UNNAMED -Djdk.reflect.useDirectMethodHandle=false -Dio.netty.tryReflectionSetAccessible=true org.apache.spark.deploy.worker.Worker --webui-port 8081 spark://192.168.1.25:7077
========================================
WARNING: Using incubator modules: jdk.incubator.vector
Using Spark's default log4j profile: org/apache/spark/log4j2-defaults.properties
25/11/27 12:57:52 INFO Worker: Started daemon with process name: 14@vader
25/11/27 12:57:52 INFO SignalUtils: Registering signal handler for TERM
25/11/27 12:57:52 INFO SignalUtils: Registering signal handler for HUP
25/11/27 12:57:52 INFO SignalUtils: Registering signal handler for INT
25/11/27 12:57:52 WARN NativeCodeLoader: Unable to load native-hadoop library for your platform... using builtin-java classes where applicable
Using Spark's default log4j profile: org/apache/spark/log4j2-defaults.properties
25/11/27 12:57:52 INFO SecurityManager: Changing view acls to: alice
25/11/27 12:57:52 INFO SecurityManager: Changing modify acls to: alice
25/11/27 12:57:52 INFO SecurityManager: Changing view acls groups to: alice
25/11/27 12:57:52 INFO SecurityManager: Changing modify acls groups to: alice
25/11/27 12:57:52 INFO SecurityManager: SecurityManager: authentication disabled; ui acls disabled; users with view permissions: alice groups with view permissions: EMPTY; users with modify permissions: alice; groups with modify permissions: EMPTY; RPC SSL disabled
25/11/27 12:57:52 INFO Utils: Successfully started service 'sparkWorker' on port 34025.
25/11/27 12:57:52 INFO Worker: Worker decommissioning not enabled.
25/11/27 12:57:53 INFO Worker: Starting Spark worker 192.168.1.25:34025 with 2 cores, 4.0 GiB RAM
25/11/27 12:57:53 INFO Worker: Running Spark version 4.0.1
25/11/27 12:57:53 INFO Worker: Spark home: /opt/spark
25/11/27 12:57:53 INFO ResourceUtils: ==============================================================
25/11/27 12:57:53 INFO ResourceUtils: No custom resources configured for spark.worker.
25/11/27 12:57:53 INFO ResourceUtils: ==============================================================
25/11/27 12:57:53 INFO JettyUtils: Start Jetty 0.0.0.0:8081 for WorkerUI
25/11/27 12:57:53 INFO Utils: Successfully started service 'WorkerUI' on port 8081.
25/11/27 12:57:53 INFO WorkerWebUI: Bound WorkerWebUI to 0.0.0.0, and started at http://vader:8081
25/11/27 12:57:53 INFO Worker: Connecting to master 192.168.1.25:7077...
25/11/27 12:57:53 INFO TransportClientFactory: Successfully created connection to /192.168.1.25:7077 after 13 ms (0 ms spent in bootstraps)
25/11/27 12:57:53 INFO Worker: Successfully registered with master spark://vader:7077
25/11/27 12:57:53 INFO Worker: Worker cleanup enabled; old application directories will be deleted in: /opt/spark/work-dir
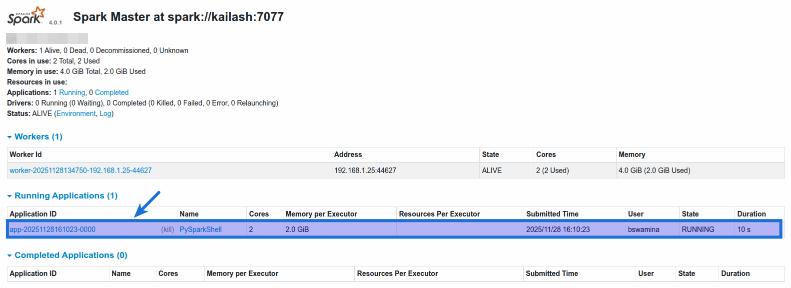
Refresh the Spark Master Web UI and the following illustration depicts that a Spark Worker node is registered (pointed by the red arrow):

Open the web browser and navigate to the URL http://192.168.1.25:8081 to launch the Spark Worker Web UI.
The following illustration depicts the Spark Worker web UI:

At this point there is one Worker node that is registered with the Master node and the Standalone cluster manager is ready to accept user application jobs !
Now, open a new terminal window and start the pyspark shell by executing the following command:
$ docker run --rm --name pyspark --network host -u $(id -u $USER):$(id -g $USER) -v $HOME/spark/conf:/opt/spark/conf -v $HOME/spark/data:/opt/spark/data -v $HOME/spark/work-dir:/opt/spark/work-dir -it ps-spark:v4.0.1 /opt/spark/bin/pyspark --master spark://192.168.1.25:7077 --deploy-mode client
The following should be the typical output:
Python 3.10.12 (main, Aug 15 2025, 14:32:43) [GCC 11.4.0] on linux
Type "help", "copyright", "credits" or "license" for more information.
WARNING: Using incubator modules: jdk.incubator.vector
Using Spark's default log4j profile: org/apache/spark/log4j2-defaults.properties
Setting default log level to "WARN".
To adjust logging level use sc.setLogLevel(newLevel). For SparkR, use setLogLevel(newLevel).
25/11/27 12:58:43 WARN NativeCodeLoader: Unable to load native-hadoop library for your platform... using builtin-java classes where applicable
Setting Spark log level to "INFO".
Welcome to
      ____              __
     / __/__  ___ _____/ /__
    _\ \/ _ \/ _ `/ __/  '_/
   /__ / .__/\_,_/_/ /_/\_\   version 4.0.1
      /_/

Using Python version 3.10.12 (main, Aug 15 2025 14:32:43)
Spark context Web UI available at http://vader:4040
Spark context available as 'sc' (master = spark://192.168.1.25:7077, app id = app-20251127125844-0000).
SparkSession available as 'spark'.
>>>
Once again, refresh the Spark Master Web UI and the following illustration depicts that a pyspark application is registered (pointed by the blue arrow):
We are now ready for the hands-on demonstartion !!!
Hands-on PySpark (Standalone Cluster)
Notice that by default, the pyspark shell creates an instance of SparkSession named spark and an instance of SparkContext named sc.
In Spark, a Resilient Distributed Dataset (or RDD for short) is an immutable collection of object(s) that is partitioned and distributed across the Worker nodes in a cluster.
One can create an RDD in pyspark by calling the parallelize() function on the SparkContext and passing in a list of objects.
To create a pyspark RDD named numbers, execute the following code snippet:
>>> numbers = sc.parallelize(['zero', 'one', 'two', 'three', 'four', 'five', 'six', 'seven', 'eight', 'nine'])
Executing the above Python code generates no output.
The textFile() function on the SparkContext takes as argument a string that represents the path to a text file and creates an RDD by loading the contents of that file.
To create a pyspark RDD named lines from a text file, execute the following code snippet:
>>> lines = sc.textFile('/opt/spark/data/Spark.txt')
Executing the above Python code generates no output.
The count() function on an RDD is an action, which returns the number of elements from the associated RDD.
To check the count of elements in the lines RDD, execute the following code snippet:
>>> lines.count()
Executing the above Python code generates the following typical output:
13
The filter() function on an RDD is a transformation operation, which returns another RDD containing elements from the associated RDD that satisfy the conditions of the specified lambda function.
Note that the RDD Tranformation functions are not executed immediately. Instead, they are lazily evaluated, meaning they are evaluated only when an action function is invoked on them.
To create a new RDD called threes by filtering (selecting) all the words with 3 letters from the numbers RDD, execute the following code snippet:
>>> threes = numbers.filter(lambda s: len(s) == 3)
Executing the above Python code generates no output.
In summary, RDDs support two types of operations - actions and transformations.
Transformations return a new RDD from a specified RDD, while Actions compute results that are returned to the Driver.
The collect() function on an RDD is an action operation that returns all the elements from the associated RDD. So, be very CAREFUL when using this function - this function expects all the objects of the RDD to fit in memory of a single node.
To check the count of elements in the lines RDD, execute the following code snippet:
To collect and display all the elements in the threes RDD, execute the following code snippet:
>>> threes.collect()
Executing the above Python code generates the following typical output:
['one', 'two', 'six']
To create a new RDD called sparks by filtering (selecting) all the elements from the lines RDD containing the work spark, execute the following code snippet:
>>> sparks = lines.filter(lambda s: 'spark' in s.lower())
Executing the above Python code generates no output.
The take() function on an RDD is an action operation that returns the specified number of elements from the associated RDD.
To take and display 3 elements from the sparks RDD, execute the following code snippet:
>>> sparks.take(3)
Executing the above Python code generates the following typical output:
['Apache Spark is an open source cluster computing framework originally developed in the AMPLab at University of California, Berkeley', "MapReduce paradigm, Spark's multi-stage in-memory primitives provides performance up to 100 times faster for certain applications.", "By allowing user programs to load data into a cluster's memory and query it repeatedly, Spark is well-suited to machine learning algorithms."]
The flatMap() function on an RDD is a transformation operation that applies the specified lambda function to each element of the associated RDD and returns a new RDD with the objects from the iterators returned by the lambda function.
To create a new RDD called words by converting all the lines from the sparks RDD into individual words, execute the following code snippet:
>>> words = sparks.flatMap(lambda s : s.split(' '))
Executing the above Python code generates no output.
The countByValue() function on an RDD is an action operation that returns the number of times each element occurs in the associated RDD.
To get a dictionary of all the words along with their respective counts from the RDD called words, execute the following code snippet:
>>> words.countByValue()
Executing the above Python code generates the following typical output:
defaultdict(<class 'int'>, {'Apache': 3, 'Spark': 9, 'is': 3, 'an': 1, 'open': 1, 'source': 1, 'cluster': 3, 'computing': 1, 'framework': 1, 'originally': 1, 'developed': 1, 'in': 5, 'the': 3, 'AMPLab': 1, 'at': 1, 'University': 1, 'of': 2, 'California,': 1, 'Berkeley': 1, 'MapReduce': 1, 'paradigm,': 1, "Spark's": 1, 'multi-stage': 1, 'in-memory': 1, 'primitives': 1, 'provides': 1, 'performance': 1, 'up': 1, 'to': 3, '100': 1, 'times': 1, 'faster': 1, 'for': 1, 'certain': 1, 'applications.': 1, 'By': 1, 'allowing': 1, 'user': 1, 'programs': 1, 'load': 1, 'data': 1, 'into': 1, 'a': 8, "cluster's": 1, 'memory': 1, 'and': 2, 'query': 1, 'it': 2, 'repeatedly,': 1, 'well-suited': 1, 'machine': 2, 'learning': 1, 'algorithms.': 1, 'requires': 1, 'manager': 1, 'distributed': 2, 'storage': 1, 'system.': 1, 'For': 2, 'management,': 1, 'supports': 2, 'standalone': 1, '(native': 1, 'cluster),': 1, 'Hadoop': 2, 'YARN,': 1, 'or': 2, 'Mesos.': 1, 'storage,': 1, 'can': 3, 'interface': 1, 'with': 2, 'wide': 1, 'variety,': 1, 'including': 1, 'Distributed': 1, 'File': 1, 'System': 1, '(HDFS),': 1, 'Cassandra,': 1, 'OpenStack': 1, 'Swift,': 1, 'Amazon': 1, 'S3,': 1, 'Kudu,': 1, 'custom': 1, 'solution': 1, 'be': 2, 'implemented.': 1, 'also': 1, 'local': 1, 'file': 1, 'system': 1, 'used': 1, 'instead;': 1, 'such': 1, 'scenario,': 1, 'run': 1, 'on': 1, 'single': 1, 'one': 2, 'executor': 1, 'per': 1, 'CPU': 1, 'core.': 1, 'had': 1, 'excess': 1, '465': 1, 'contributors': 1, '2014,': 1, 'making': 1, 'not': 1, 'only': 1, 'most': 1, 'active': 1, 'project': 1, 'Software': 1, 'Foundation': 1, 'but': 1})
At this point, let us summarize the commonly used transformation and action functions on an RDD.
The following is the summary of the commonly used RDD transformation functions:
| Tranformation Function | Description |
|---|---|
| parallelize | Takes a list of elements as input anc converts it into an RDD |
| textFile | Takes a string that represents a path to a text file and loads the contents into an RDD |
| filter | Executed to an existing RDD. Takes a lambda function as input and applies the specified lambda function to each element of the existing RDD. Returns a new RDD with only those elements that evaluated to true when the specified lambda function was applied |
| map | Executed to an existing RDD. Takes a lambda function as input and returns a new RDD by applying the specified lambda function to each element of the existing RDD |
| flatMap | Executed to an existing RDD. Takes a lambda function as input and applies the specified lambda function to each element of the existing RDD. The lambda function returns an iterator for each element. Returns a new RDD which is a collection of all the elements from all the iterators after flattening them |
The following is the summary of the commonly used RDD action functions:
| Action Function | Description |
|---|---|
| count | Executed to an existing RDD. Returns the number of elements in the specified RDD |
| foreach | Executed to an existing RDD. Takes a lambda function as input and applies the specified lambda function to each element of the specified RDD. There is no return value |
| take | Executed to an existing RDD. Takes a integer as input and returns the specified number of elements from the specified RDD |
| collect | Executed to an existing RDD. Returns all the elements from the specified RDD. Use this function with CAUTION as all the elements from the specified RDD must to fit in memory of this node |
| countByValue | Executed to an existing RDD. Returns the number of times each element occurs in the specified RDD |
Note that RDD is currently in MAINTENANCE mode and the shift is towards the Dataframes !!!
With this, we conclude the setup and demonstration of Apache Spark on a Linux desktop in the Standalone Cluster mode !!!
References